 ReyesReyes
Display ... Camera ... Reyes ... Rays ... Acceleration ... Spooling
The Reyes panel provides you direct control over the various quality settings associated with the reyes algorithm, allowing you to make tradeoffs between making your image look better, and making it render faster.
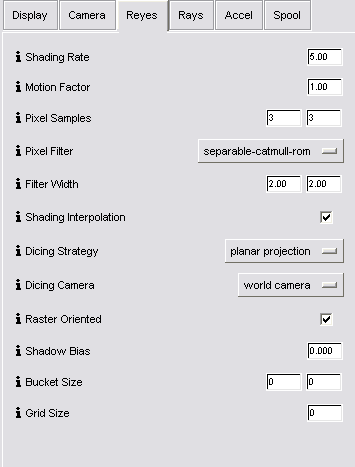
Shading Rate - Shading rate is the most effective means for trading off image quality against rendering time - it has an immediate effect on both. It controls the size of generated micropolygons in the renderer, which in turns affects the number of times in an image that a shading computation is performed; for example, a setting of 0.25 means that the renderer will shade once every 0.25 pixels, in each dimension (in other words, 16 times per pixel).
A large shading rate such as 20 or even 64 is well suited for preview rendering - it will cause the renderer to go much faster, at the expense of losing fine shading detail and causing curved surfaces to look faceted. For final renderings, values such as 1.0 (about once per pixel) or even 0.25 are typically used.
Pixel Samples - Geometric aliasing is reduced in the renderer by the use of supersampling - sampling geometry multiple times per pixel. This field gives you control over how many times supersampling is done per pixel in each dimension. Setting it to 1 effectively disables geometric antialiasing, while setting it to 3 samples the geometry 9 times per pixel. Values between 1 and 4 are typical, but if you have very fine geometry such as hair, or if you are performing motion blurring or depth of field, you may need to set the pixel sampling rate higher. Note that in PRMan, pixel sampling is decoupled from shading and thus a very high pixel sampling does not incur the high overhead of greatly increased shading.
Pixel Filter and Width - The final color of a pixel is determined by combining pixel super samples using a filter. The choice of the filter and the filter width (measured in pixels, in each dimension) has an effect on the final "look" of the image - a soft look can be achieved by using a wide gaussian filter, while a harder edge look can be found by using a higher pixel sample rate and a narrow sinc filter. The choice of pixel filters also has an effect on render times - box filters are cheaper than sinc filters, with the Catmull-Rom filter somewhere in the middle (both in time and blurriness).
Shading Interpolation - Shading interpolation enables Gouraud shading, which causes shading values to be interpolated across micropolygons. It is primarily useful if the shading rate is higher and you have large micropolygons; as the shading rate and micropolygons get smaller, shading interpolation has less visible effect.
Binary Dicing - Binary dicing causes parametric patches to be subdivided into grids of micropolygons with power of two dimensions. It helps reduce the chance that cracks will appear between adjacent patch grids, at a cost of speed. It is especially useful when using displacement shaders.
Shadow Bias - This field sets the default shadow bias used by the renderer, if the shader does not specify one. The use of shadow bias to prevent self shadowing artifacts is further described in detail in Section 4.9 of the PRMan User Manual and in AppNote 15. Note that setting it this field to 0 will cause PRMan to use the default shadow bias.
Eyesplits - This field sets the default eyesplits setting used by the renderer. Eyesplits can be a problem when geometry is very close to the camera, and actually falls astride both the near clipping plane and eye plane. In this case the renderer may use up large amounts of memory trying to split the object. It is usually solved by pushing the near clipping plane out as far as possible, or by remodelling the scene to avoid having the camera too close to geometry. In cases where this is not possible, setting the eyesplits limit lower will force the renderer to give up splitting sooner, causing it to use less memory and time at the expense of possible clipping of geometry. More details on eyesplits can be found in Section 4.8 of the PRMan User Manual. Note that if you set this field to zero, the RenderMan default of 10 will be used instead.
Bucket Size - PRMan subdivides the output image into small rectangular regions called buckets, and renders a single bucket at a time. This is done to avoid having to keep every micropolygon for the image in memory at the same time. Larger buckets, in conjunction with a larger grid size, allows shading of more micropolygons in parallel and is thus more efficient, however this will require more memory to render. Conversely, smaller buckets are less efficient for shading, but will use less memory during rendering. If your scene is using a lot of memory, you may want to try setting this field down to 8 by 8 or even 4 by 4 buckets.
Leaving the field at 0 will use PRMan's default setting (usually 16 by 16), which is suitable for most scenes. Details on the bucket size setting can be found in Section 4.2 of the PRMan User Manual.
Grid Size - In PRMan, geometry is split into grids, which are sets of micropolygons which are shaded in parallel. Larger grids (which will require a larger bucket size to produce) allows more micropolygons to be present in a grid, which will cause shading to be more efficient at the cost of memory. Note that the grid size is also affected by the shading rate, because larger micropolygons will require a larger grid, which may not fit in the current bucket.
Leaving the field at 0 will use PRMan's default setting (usually 256), which is suitable for most scenes. Details on the grid size setting can be found in Section 4.3 of the PRMan User Manual.
Motion Factor - The motion factor setting is an optimization applied only when using motion blur. When using motion blur, fine shading detail is lost and thus the effects of a low shading rate is wasted. Having this field set to 1.00 causes the renderer to automatically raise the shading rate on objects which are blurred a large distance across the screen, thus speeding up the render. Setting the field higher will cause the renderer to raise the shading rate even higher, while setting it to zero disables the changing of the shading rate. More details on motion factor can be found in Section 5.5 of the PRMan User Manual.
|
Pixar Animation Studios
|