Ambient Occlusion, Image-Based Illumination, and Global Illumination
April 2002 (Revised August 2005)

Ambient Occlusion, Image-Based Illumination, and Global IlluminationApril 2002 (Revised August 2005) |
|
The purpose of this application note is to provide recipes and examples for how to render global illumination effects with Pixar's RenderMan. Among the possible effects are super-soft shadows from ambient occlusion, image-based environment illumination (including high dynamic range images, or HDRI), color bleeding, and general global illumination. We also show how to “bake” ambient occlusion and indirect illumination for reuse in an animation.
An approximation of the very soft contact shadows that appear on an overcast day can be found by computing how large a fraction of the hemisphere above each point is covered by other objects. This is referred to as ambient occlusion, geometric occlusion, coverage, or obscurance.
The occlusion can be computed with a gather loop:
    float hits = 0;
    gather("illuminance", P, N, PI/2, samples, "distribution", "cosine") {
      hits += 1;
    }
    float occlusion = hits / samples;
This gather loop shoots rays in random directions on the hemisphere; the number of rays is specified by the "samples" parameter. The rays are distributed according to a cosine distribution, i.e. more rays are shot in the directions near the zenith (specified by the normalized surface normal N) than in directions near the horizon. For each ray hit, the variable 'hits' is incremented by one. After the gather loop, occlusion is computed as the number of hits divided by the number of samples. "samples" is a quality-knob: more samples give less noise but take longer. Any value of "samples" can be used, but for the cosine distribution "samples" values of 4 times a square number (i.e. 4, 16, 36, 64, 100, 144, 196, 256…) are particularly cost-efficient.
This gather loop can be put in a surface shader or in a light shader. The following is an example of a surface shader that computes the occlusion at the shading point. The color is bright if there is little occlusion and dark if there is much occlusion.
    surface
    occsurf1(float samples = 64)
    {
      normal Ns = shadingnormal(N);

      /* Compute occlusion */
      float hits = 0;
      gather("illuminance", P, Ns, PI/2, samples, "distribution", "cosine") {
        hits += 1;
      }
      float occlusion = hits / samples;

      /* Set Ci and Oi */
      Ci = (1.0 - occlusion) * Cs;
      Oi = 1;
    }
And here is a light source shader that does the same; this color is
then added in the diffuse loop of surface shaders.
    light
    occlusionlight1(
      float samples = 64;
      color filter = color(1);
      output float __nonspecular = 1;)
    {
      normal Ns = shadingnormal(N);

      illuminate (Ps + Ns) {  /* force execution independent of light location */

        /* Compute occlusion */
        float hits = 0;
	gather("illuminance", Ps, Ns, PI/2, samples,
               "distribution", "cosine") {
          hits += 1;
        }
	float occlusion = hits / samples;

        /* Set Cl */
	Cl = filter * (1 - occlusion);
      }
    }
The following rib file contains a matte sphere, box, and ground plane. The objects are illuminated by the 'occlusionlight1' light which adds occlusion-dependent color to the diffuse loop in the matte shader.
    FrameBegin 1
      Format 400 300 1
      PixelSamples 4 4
      ShadingInterpolation "smooth"
      Display "occlusion" "it" "rgba"   # render image to 'it'
      Projection "perspective" "fov" 22
      Translate 0 -0.5 8
      Rotate -40  1 0 0
      Rotate -20  0 1 0

      WorldBegin
        LightSource "occlusionlight1" 1 "samples" 16

        Attribute "visibility" "int diffuse" 1   # make objects visible to rays
        Attribute "visibility" "int specular" 1   # make objects visible to rays
        Attribute "trace" "bias" 0.005

        # Ground plane
        AttributeBegin
          Surface "matte"
          Color [1 1 1]
          Scale 3 3 3
          Polygon "P" [ -1 0 1  1 0 1  1 0 -1  -1 0 -1 ]
        AttributeEnd

        # Sphere
        AttributeBegin
          Surface "matte"
          Color 1 0 0
          Translate -0.7 0.5 0
          Sphere 0.5  -0.5 0.5  360
        AttributeEnd

        # Box (with normals facing out)
        AttributeBegin
          Surface "matte"
          Translate 0.3 0.01 0
          Rotate -30  0 1 0
          Color [0 1 1]
          Polygon "P" [ 0 0 0  0 0 1  0 1 1  0 1 0 ]   # left side
          Polygon "P" [ 1 1 0  1 1 1  1 0 1  1 0 0 ]   # right side
          Color [1 1 0]
          Polygon "P" [ 0 1 0  1 1 0  1 0 0  0 0 0 ]   # front side
          Polygon "P" [ 0 0 1  1 0 1  1 1 1  0 1 1 ]   # back side
          Color [0 1 0]
          Polygon "P" [ 0 1 1  1 1 1  1 1 0  0 1 0 ]   # top
        AttributeEnd
      WorldEnd
    FrameEnd
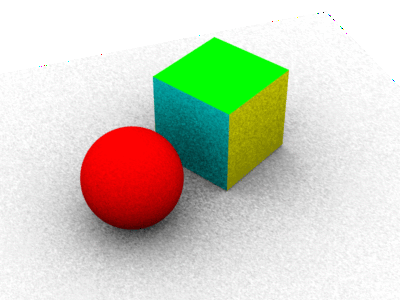
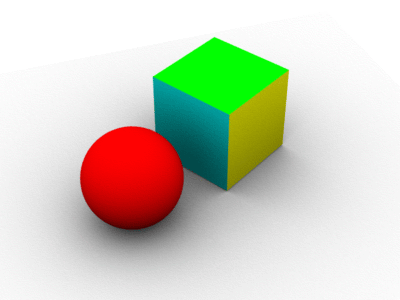
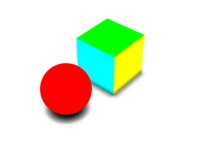
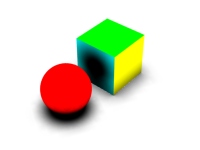
The resulting image (below, left) is very noisy since "samples" was set to only 16. This means that the occlusion at each point was estimated with only 16 rays. In the image on the right, "samples" was set to 256. As one would expect, the noise is significantly reduced.
|
|
Computing occlusion using gather at every shading point is very time-consuming. But, since occlusion varies slowly at locations far from other objects, it is often sufficient to do gathers only at the shading points that are at corners of micropolygon grids and just interpolate the occlusion at other shading points. In a typical scene relatively few parts of the scene are so close to other objects that occlusion has to be computed at every single shading point.
We exploit this fact with the occlusion function. The occlusion function only does gathers where it has to; at most locations it can just interpolate occlusion from other gathers nearby. Similar to the gather loops discussed above, "samples" is a quality-knob: more samples give less noise but take longer. Once again, any value of "samples" can be used, but values of 4 times a square number (ie. 4, 16, 36, 64, 100, 144, 196, 256…) are particularly cost-efficient.
The occlusion function can be called from surface or light shaders. Here is an example of a surface shader that calls occlusion:
    surface
    occsurf2(float samples = 64, maxvariation = 0.02)
    {
      normal Ns = shadingnormal(N); // normalize N and flip it if backfacing

      // Compute occlusion
      float occ = occlusion(P, Ns, samples, "maxvariation", maxvariation);

      // Set Ci and Oi
      Ci = (1 - occ) * Cs * Os;
      Oi = Os;
    }
And here is an example of a light shader that calls occlusion:
    light
    occlusionlight2(
      float samples = 64, maxvariation = 0.02;
      color filter = color(1);
      output float __nonspecular = 1;)
    {
      normal Ns = shadingnormal(N);

      illuminate (Ps + Ns) { /* force execution independent of light location */
	float occ = occlusion(Ps, Ns, samples, "maxvariation", maxvariation);
	Cl = filter * (1 - occ);
      }
    }
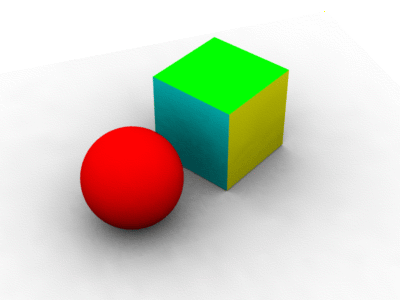
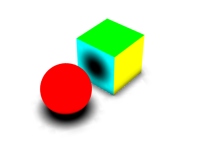
If the rib file in section 2.1 is changed to use occlusionlight2 instead of occlusionlight1, the following image will be computed.
|
Using occlusionlight2 (with 256 samples and maxvariation 0.05) instead of occlusionlight1 makes rendering this scene approximately 20 times faster.
The occlusion function uses the parameter "maxvariation" as a time/quality knob. Alternatively, the time/quality can be determined by the parameter "maxerror" or the attribute "irradiance" "maxerror" as explained below. "maxvariation" specifies how much the interpolated occlusion values are allowed to deviate from the true occlusion. PRMan uses this value to determine where the occlusion can be interpolated and where it must be computed (using ray tracing). If "maxvariation" is 0, the occlusion is computed at every shading point. If "maxvariation" is very high (like 1), occlusion is only computed at the corners of micropolygon grids and interpolated everywhere else. With intermediate values for "maxvariation", the occlusion is computed sparsely where it varies slowly and consistently, and computed densely where it changes rapidly. For high-quality final rendering, "maxvariation" values in the 0.01 to 0.02 range are typical; for quick preview renderings values of 0.05 or even 0.1 can be used.
In earlier versions of PRMan, the occlusion time/quality was determined by a parameter called "maxerror", and this parameter is still used if "maxvariation" is not specified (or is negative). If neither "maxvariation" nor "maxerror" is given as a parameter to the occlusion function, the value of the maxerror attribute will be used. (The default value of the attribute is 0.5.) Technical detail: maxerror is a multiplier on the harmonic mean distance of the rays that were shot to estimate the occlusion at a point. A fairly unintuitive and non-linear control.
(The "maxvariation" parameter was introduced in PRMan version 12.5.1. "maxvariation" is a better error metric than "maxerror" and should be used instead of it: the same quality can be obtained with fewer occlusion calculations, and it is therefore faster. Furthermore, the control is more intuitive.)
Another optimization occlusion() uses is adaptive sampling of the hemisphere. This is turned on by default if the number of samples is at least 64. If you want to turn it off, set the optional parameter "adaptive" to 0. If "adaptive" is on and the optional parameter "minsamples" is supplied the hemisphere will be adaptively sampled with at least "minsamples" (if "minsamples" is not supplied, "samples"/4 will be used). Setting minsamples to less than one quarter of "samples" is not recommended. Adaptive sampling gives good speedups for most scenes, with the exception of scenes that contain a lot of tiny objects.
In the example above, the box was slightly above the ground plane. If it was exactly on the plane, or going through the plane, the occlusion right on the edge would be very jagged and aliased. One way to overcome this is to jitter the origins of the rays shot to sample the hemisphere. This is done with the optional "samplebase" parameter of occlusion(). A value of 0 means no jittering, a value of 1 means jittering over the size of a micropolygon.
There are a few knobs to tweak for artistic choices for the ambient occlusion “look”.
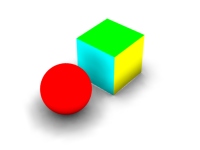
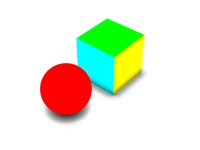
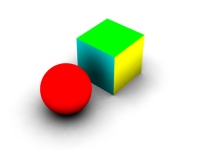
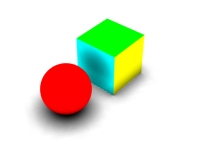
The shader occsurf3 below shows an example of using the maxdist and coneangle parameters.
    surface occsurf3(float samples = 64, maxdist = 1e30, coneangle = PI/2)
    {
      normal Ns = shadingnormal(N); // normalize N and flip it if backfacing

      // Compute occlusion
      float occ = occlusion(P, Ns, samples, "maxdist", maxdist, "coneangle", coneangle);

      // Set Ci and Oi
      Ci = (1 - occ) * Cs * Os;
      Oi = Os;
    }
The figure below shows nine variations of maxdist and coneangle. Upper row: coneangle pi/2; middle row: coneangle pi/4; bottom row: coneangle pi/8. Left column: maxdist 1; middle column: maxdist 0.5; right column: maxdist 0.2.
 |
 |
 |
 |
 |
 |
 |
 |
 |
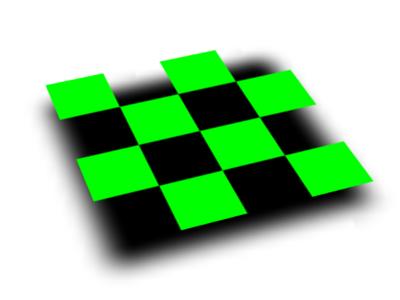
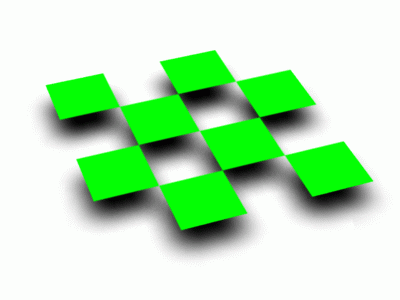
The figure below shows an example of the use of the 'hitmode' parameter. The scene consists of a ground plane and a single square polygon floating above it. The square polygon has a checkerboard shader that returns green or transparent depending on the (s,t) of each shading point. The shader on the white ground plane computes ambient occlusion. In the left image, the occlusion() parameter "hitmode" is set to "default" or "primitive". In the image to the right, "hitmode" is set to "shader". (The effect in the right image can also be obtained by setting the square polygon's attribute "shade" "diffusehitmode" to "shader".)
 |
 |
The occlusion function has a few additional optional parameters: "bias" can be used to overrule the ray tracing bias attribute. "maxerror" and "maxpixeldist" can be used to overrule their attributes.
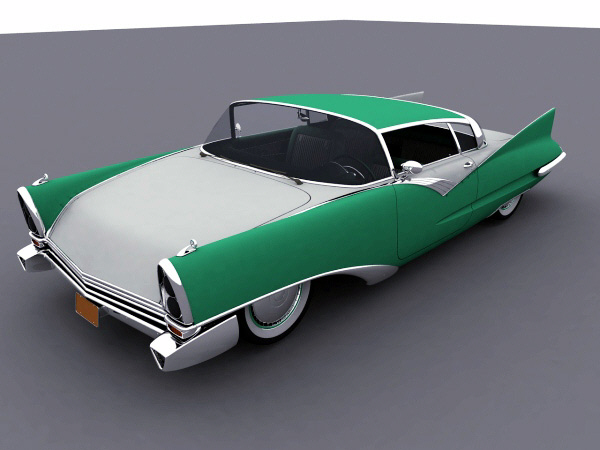
Here is a more complicated scene showing occlusion. The areas under the car, as well as the concave parts of the car body, have the very soft darkening that one would expect. (The bumpers and body trim have a chrome material attached to them, so they just reflect light from the mirror direction.)
For some looks, we want to illuminate the scene with light from the environment. Most commonly, the light from the environment is determined from an environment map image; this technique is called “image-based environment illumination” or simply image-based illumination.
To compute image-based illumination, we can either extend the gather loop or use more information from the occlusion function. There are two commonly used ways of doing the environment map look-ups: either compute the average ray direction for ray misses and use that direction to look up in a pre-blurred environment map, or do environment map look-ups for all ray misses. The examples in this section show both these variations.
Common to all these techniques is that the used images (of course) can be high dynamic range images.
We first extend the gather loop to compute the average ray direction for ray misses. This direction is sometimes called a “bent normal”, but we prefer the terms “average unoccluded direction” or “environment direction”. This direction is used to look up in a pre-blurred environment map. (The environment map should be blurred a lot!)
Here is an example of a light source shader that computes image-based illumination this way:
    light
    environmentlight1(
      float samples = 64;
      string envmap = "";
      color filter = color(1);
      output float __nonspecular = 1;)
    {
      normal Ns = shadingnormal(N);

      illuminate (Ps + Ns) { /* force execution independent of light location */

        /* Compute occlusion and average unoccluded dir (environment dir) */
        vector dir = 0, envdir = 0;
        float hits = 0;
	gather("illuminance", Ps, Ns, PI/2, samples,
               "distribution", "cosine", "ray:direction", dir) {
          hits += 1;
        } else { /* ray miss */
          envdir += dir;
        }
        float occ = hits / samples;
        envdir = normalize(envdir);

        /* Lookup in pre-blurred environment map */
        color envcolor = environment(envmap, envdir);

	/* Set Cl */
	Cl = filter * (1 - occ) * envcolor;
      }
    }
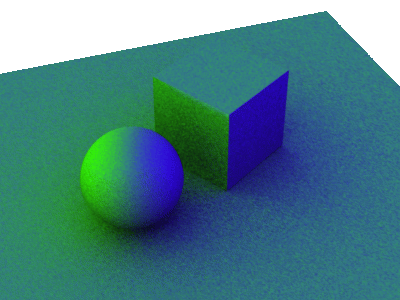
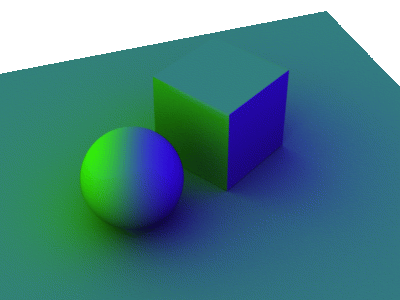
For a first example of image-based illumination, we can replace the light
source in the previous scene with
LightSource "environmentlight1" 1 "environmentmap" "greenandblue.tex" "samples" 256
(Here greenandblue.tex is a texture that is green to the left, blue
to the right, and cyan in between.) All objects are white and pick up
color from the environment map. The resulting images (with "samples"
set to 16 and 256, respectively) look like this:
|
|
We can improve the efficiency of image-based illumination by using the occlusion function. The occlusion function computes the average unoccluded direction while it is computing the occlusion, and also interpolates the unoccluded directions.
    light
    environmentlight2(
      float samples = 64, maxvariation = 0.02;
      string envmap = "";
      color filter = color(1);
      output float __nonspecular = 1;)
    {
      normal Ns = shadingnormal(N);

      illuminate (Ps + Ns) { /* force execution independent of light location */

        /* Compute occlusion and average unoccluded dir (environment dir) */
        vector envdir = 0;
        float occ = occlusion(Ps, Ns, samples, "maxvariation", maxvariation,
                              "environmentdir", envdir);

        /* Lookup in pre-blurred environment map */
        color envcolor = environment(envmap, envdir);

	/* Set Cl */
	Cl = filter * (1 - occ) * envcolor;
      }
    }
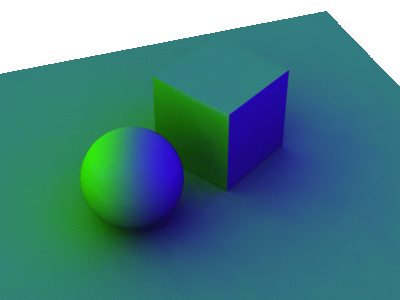
The resulting image (using 256 samples) looks like this:
|
Because of the interpolation done in the occlusion function, this image is much faster to compute than the image shown in section 3.2 (right). Again, the environment image needs to be blurred a lot.
We can improve the accuracy of the image-based illumination with little extra cost by performing one environment map lookup for each ray miss (instead of averaging the ray miss directions and doing one environment map lookup at the end).
    light
    environmentlight3(
      float samples = 64;
      string envmap = "";
      color filter = color(1);
      output float __nonspecular = 1;)
    {
      normal Ns = shadingnormal(N);

      illuminate (Ps + Ns) { /* force execution independent of light location */

	/* Compute average color of ray misses */
        vector dir = 0;
        color irrad = 0;
	gather("illuminance", Ps, Ns, PI/2, samples,
               "distribution", "cosine", "ray:direction", dir) {
          /* (do nothing for ray hits) */
        } else { /* ray miss */
          /* Lookup in environment map */
          irrad += environment(envmap, dir);
        }
        irrad /= samples;

	/* Set Cl */
	Cl = filter * irrad;
      }
    }
In the example above this wouldn't make much difference, but if the environment texture had more variation there could be a big difference between the color seen in the average unoccluded direction and the average of the colors seen in the unoccluded directions. An example of a case where this would make a big difference is right under an object: the average direction may be right through the object while the visible parts of the environment form a “rim” around the object.
For improved efficiency, we can again replace the gather loop with a call of the occlusion function. This version of the environment light looks like this:
    light
    environmentlight4(
      float samples = 64, maxvariation = 0.02;
      string envmap = "";
      color filter = color(1);
      output float __nonspecular = 1;)
    {
      normal Ns = shadingnormal(N);

      illuminate (Ps + Ns) { /* force execution independent of light location */

	/* Compute average color of ray misses (ignore occlusion) */
        color irrad = 0;
        float occ = occlusion(Ps, Ns, samples, "maxvariation", maxvariation,
                              "environmentmap", envmap,
                              "environmentcolor", irrad);

	/* Set Cl */
	Cl = filter * irrad;
      }
    }
For reduced noise, it pays off to pre-blur the environment map a bit. (This gives less noise in the sampling of the environment map.)
New for PRMan 12.5.2: When the occlusion function is provided with an environment map for image-based illumination, the environment map will automatically be used to importance sample the hemisphere: more rays will be shot in directions where the environment map is bright than in directions where it is dark. This significantly reduces the noise in the computed environmentcolor, and makes it possible to reduce the number of samples. The meaning of the value returned by the occlusion function changes when an environment map is used like this: instead of being the fraction of the hemisphere that is occluded by objects, it is the brightness-weighted fraction of the hemisphere that is occluded by objects.
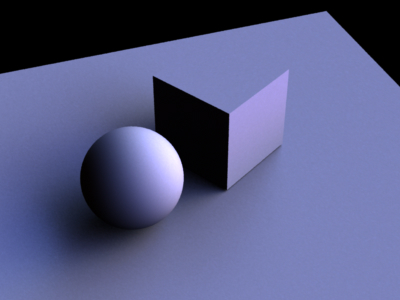
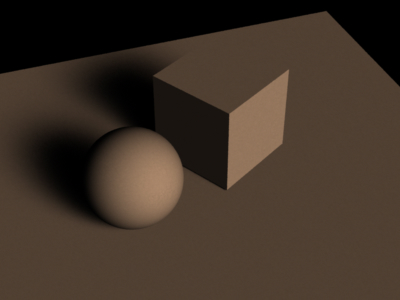
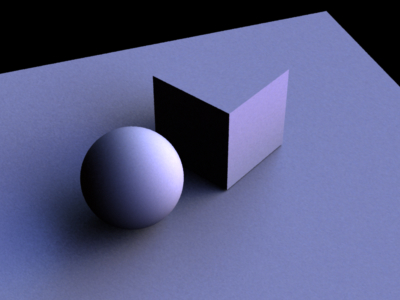
The images below were computed with image-based illumination. For the image on the left, the environment map is a high-dynamic range image of a stained-glass rosette window; for the image on the right, the environment map is a high-dynamic range image of a small, very bright spot light. Both images were computed with 256 samples and maxvariation 0. (The same visual quality can be obtained faster by using 1024 samples and maxvariation 0.02.)
 |
 |
This image-based importance sampling can be explicitly turned off by setting the parameter "brightnesswarp" to 0. The images below show how noisy the images will be, particularly if the environment map is a high-dynamic range image with a lot of brightness variation. (Both images were again computed with 256 samples and maxvariation 0.)
 |
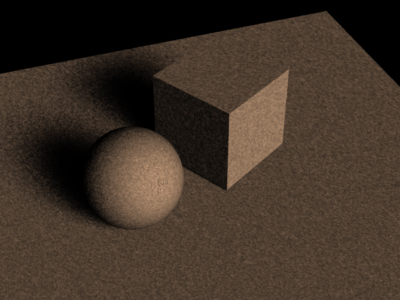 |
The only case where it makes sense to turn off the "brightnesswarp" parameter is if the environment map has nearly uniform brightness everywhere. In that case the importance sampling is a waste of time and gives no improvement in image quality.
One slightly confusing effect for environment sampling (both brighness-warped and not) is that when the number of samples changes, not only does the noise change, but the sharpness of the illumination variation changes, too. This is because the filter size of the environment map lookups is determined by the number of samples: the more samples (rays), the smaller the filter size.
Color bleeding is a term that is used to describe the effect of a red carpet next to a white wall giving a pink tint to the wall. Color bleeding is a diffuse-to-diffuse effect.
In this section we will only look at how to compute a single bounce of diffuse-to-diffuse reflection. In the following section, we will consider multiple bounces.
The illumination at a point on a diffuse surface due to light scattered from other diffuse surfaces can be found with the indirectdiffuse function:
indirectdiffuse(P, N, samples, ...)
The indirectdiffuse function contains a gather loop plus some time-saving shortcuts that we will get to later in this section. P is the point where the indirect diffuse illumination should be computed. N is the normalized surface normal at P. The "samples" parameter specifies how many rays should be shot to sample the hemisphere above point P. As with the gather loop mentioned above, "samples" is a quality-knob: more samples give less noise but take longer. Again, any value of "samples" can be used, but values of 4 times a square number (ie. 4, 16, 36, 64, 100, 144, 196, 256…) are particularly cost-efficient. An optional environmentmap can be used to look up an environment color when a ray does not hit any object. When a ray hits an object the surface shader of that object is evaluated.
The indirectdiffuse function can be called from surface shaders or light shaders. The advantage of doing it in a light shader is that the regular old-fashioned non-globillum-savvy surface shaders such as matte and paintedplastic can still be used. An example of a surface shader calling indirectdiffuse is:
    surface
    indirectsurf(float samples = 16, maxvariation = 0.02; string envmap = "")
    {
      normal Ns = shadingnormal(N);
      Ci = diffuse(Ns)
         + indirectdiffuse(P, Ns, samples, "maxvariation", maxvariation,
                           "environmentmap", envmap);
      Ci *= Cs * Os;   /* for colors and transparency */
      Oi = Os;
    }
An example of a light source calling indirectdiffuse is:
    light
    indirectlight(
      float samples = 64, maxvariation = 0.02;
      string envmap = "";
      color filter = color(1);
      output float __nonspecular = 1;)
    {
      normal Ns = shadingnormal(N);

      /* Compute indirect diffuse illumination */
      illuminate (Ps + Ns) {  /* force execution independent of light location */
	Cl = filter * indirectdiffuse(Ps, Ns, samples, "maxvariation", maxvariation,
				      "environmentmap", envmap);
      }
    }
The following rib file uses indirectlight to add diffuse-to-diffuse
light to the matte shader. The sphere and box have constant, bright
colors, and those colors “bleed” onto the diffuse ground plane.
    FrameBegin 1
      Format 400 300 1
      PixelSamples 4 4
      ShadingInterpolation "smooth"
      Display "colorbleeding" "it" "rgba"   # render image to 'it'
      Projection "perspective" "fov" 22
      Translate 0 -0.5 8
      Rotate -40  1 0 0
      Rotate -20  0 1 0

      WorldBegin

        LightSource "indirectlight" 1 "samples" 16 "maxvariation" 0
          "environmentmap" "sky.tex"

        Attribute "visibility" "int diffuse" 1   # make objects visible to rays
        Attribute "visibility" "int specular" 1   # make objects visible to rays
        Attribute "trace" "bias" 0.005

        # Ground plane
        AttributeBegin
          Surface "matte" "Kd" 0.9
          Color [1 1 1]
          Scale 3 3 3
          Polygon "P" [ -1 0 1  1 0 1  1 0 -1  -1 0 -1 ]
        AttributeEnd

        # Sphere
        AttributeBegin
          Surface "constant"
          Color 1 0 0
          Translate -0.7 0.5 0
          Sphere 0.5  -0.5 0.5  360
        AttributeEnd

        # Box (with normals facing out)
        AttributeBegin
          Surface "constant"
          Translate 0.3 0.01 0
          Rotate -30  0 1 0
          Color [0 1 1]
          Polygon "P" [ 0 0 0  0 0 1  0 1 1  0 1 0 ]   # left side
          Polygon "P" [ 1 1 0  1 1 1  1 0 1  1 0 0 ]   # right side
          Color [1 1 0]
          Polygon "P" [ 0 1 0  1 1 0  1 0 0  0 0 0 ]   # front side
          Polygon "P" [ 0 0 1  1 0 1  1 1 1  0 1 1 ]   # back side
          Color [0 1 0]
          Polygon "P" [ 0 1 1  1 1 1  1 1 0  0 1 0 ]   # top
        AttributeEnd
      WorldEnd
    FrameEnd
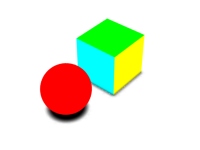
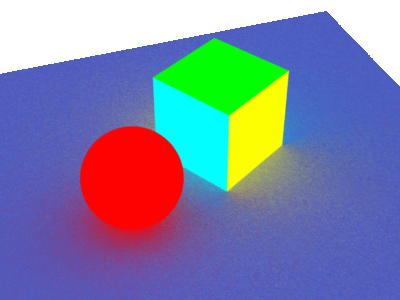
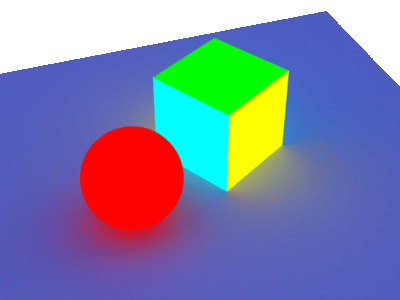
The resulting image (below, left) is very noisy, since "samples" was set to only 16. In the image on the right, "samples" was set to 256.
|
|
Shooting 256 rays from every single shading point is very time-consuming. Fortunately, diffuse-to-diffuse effects such as color bleeding usually have slow variation. We can therefore determine the diffuse-to-diffuse illumination at sparsely distributed locations, and then simply interpolate between these values. This can typically give speedups of a factor of 10 or more.
Illumination can be safely interpolated at shading points where the illumination changes slowly and consistently. The tolerance is specified by the "maxvariation" parameter, just as for the occlusion function (see sections 3.2 and 3.3). Low values of "maxvariation" give higher precision but make rendering take longer. Setting "maxvariation" too high can result in splotchy low-frequency artifacts where illumination is interpolated too far.
In the example above, the "maxvariation" parameter was set to 0, turning interpolation off. If we replace that value with 0.02 and rerender, we get the following image:
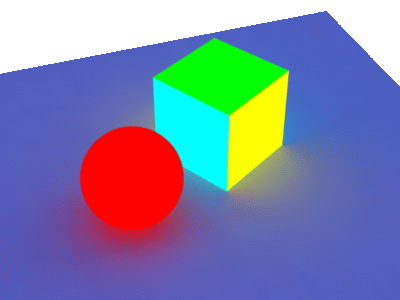
|
This image is indistinguishable, and was computed much faster.
Let's look at another example. A simple rib file describing a matte box with two spheres in it looks like this:
    FrameBegin 1
      Format 400 400 1
      ShadingInterpolation "smooth"
      PixelSamples 4 4
      Display "Cornell box, 1 bounce" "it" "rgba"   # render image to 'it'
      Projection "perspective" "fov" 30
      Translate 0 0 5

      WorldBegin
        LightSource "cosinelight_rts" 1 "from" [0 1.0001 0] "intensity" 4
        LightSource "indirectlight" 2 "samples" 256 "maxvariation" 0

        Attribute "visibility" "int diffuse" 1   # make objects visible to diffuse rays
        Attribute "visibility" "int specular" 1   # make objects visible to refl. rays

        # Matte box (with normals pointing inward)
        AttributeBegin
          Surface "matte" "Kd" 0.8   # gets indirect diffuse from diffuse()
          Color [1 0 0]
          Polygon "P" [ -1 1 -1  -1 1 1  -1 -1 1  -1 -1 -1 ]   # left wall
          Color [0 0 1]
          Polygon "P" [ 1 -1 -1  1 -1 1  1 1 1  1 1 -1 ]   # right wall
          Color [1 1 1]
          Polygon "P" [ -1 1 1  1 1 1  1 -1 1  -1 -1 1 ]   # back wall
          Polygon "P" [ -1 1 -1  1 1 -1  1 1 1  -1 1 1 ]   # ceiling
          Polygon "P" [ -1 -1 1  1 -1 1  1 -1 -1  -1 -1 -1 ]   # floor
        AttributeEnd

        # Tiny sphere indicating location of light source (~ "light bulb")
        AttributeBegin
          Attribute "visibility" "int diffuse" 0   # make light bulb invisible to rays
          Attribute "visibility" "int specular" 0   # make light bulb invisible to rays
          Attribute "visibility" "int transmission" 0   # and shadows
          Surface "constant"
          Translate 0 1 0
          Sphere 0.03  -0.03 0.03  360
        AttributeEnd

        Attribute "visibility" "int transmission" 1 # the spheres cast shadows
        Attribute "shade" "string transmissionhitmode" "primitive"

        # Left sphere (chrome)
        AttributeBegin
          Surface "mirror"
          Translate -0.3 -0.7 0.3
          Sphere 0.3  -0.3 0.3  360
        AttributeEnd

        # Right sphere (matte)
        AttributeBegin
          Surface "matte" "Kd" 0.8
          Translate 0.3 -0.7 -0.3
          Sphere 0.3  -0.3 0.3  360
        AttributeEnd
      WorldEnd
    FrameEnd
Below we see two images of the box. On the left, the box has only direct illumination (the line 'LightSource "indirectlight" 2 ...' has been commented out). On the right, the box has direct illumination and one-bounce indirect illumination.
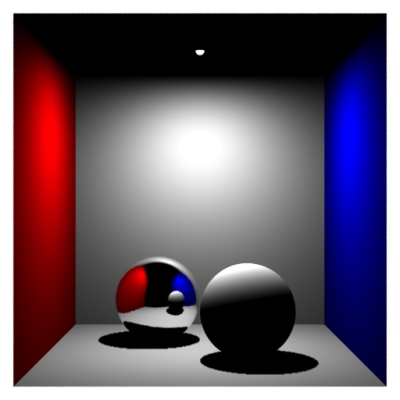 |
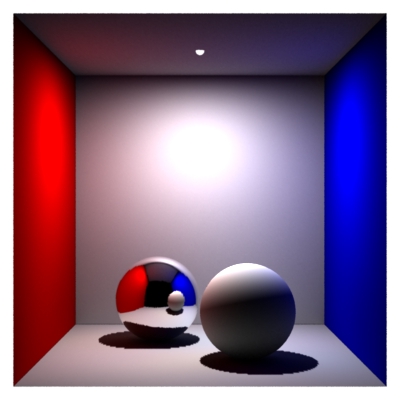 |
For historical reasons, this type of illumination computation is sometimes called final gathering only.
Changing the maxvariation parameter to a value larger than 0 enables interpolation of the indirect illumination. This can speed up the rendering significantly. Values for maxvariation in the range 0.01 to 0.02 are typical. Larger values speed up rendering but can result in splotchy artifacts.
Another optimization is adaptive sampling of the hemisphere. As with adaptive sampling in occlusion(), this is turned on by default if the number of samples is at least 64. If you want to turn it off, set the optional parameter "adaptive" to 0. If "adaptive" is on and the optional parameter "minsamples" is supplied the hemisphere will be adaptively sampled with at least "minsamples" (if "minsamples" is not supplied, "samples"/4 will be used). It is not recommended to set minsamples to less than one quarter of "samples". Adaptive sampling gives good speedups if the scene contains large bright and dark regions. If the scene contains a lot of small details (for example: small objects, small shadows, or high-frequency textures), adaptive sampling does not give any significant speedup.
For performance, it is important that the surface shaders (at the objects the indirect diffuse rays hit) are as efficient as possible. It is often possible to simplify the surface shader computation considerably for diffuse ray hits. For example, one can often reduce the number of texture map lookups, reduce the accuracy of procedurally computed values, etc.
One very important example of this occurs for light shaders that shoot multiple rays to compute antialiased ray traced shadows. Such antialiasing is important for directly visible objects or objects that are specularly reflected or refracted, but not necessary when we deal with diffuse reflection.
(One might suspect that the same issue would apply to ray traced reflection and refraction rays — shot by trace() or "illuminance" gather loops — but trace and gather already check the ray type and don't shoot any rays if the ray type is diffuse.)
So, when using a shader in a scene with color bleeding computations, it is good shader programming style to check if the ray type is diffuse (or, in general, if diffusedepth is greater than 0), and to use simpler, approximate computations wherever possible, and 1 shadow ray for ray traced shadows. The ray type can be checked with a call of rayinfo("type", type) and the diffuse ray depth can be found with a call of rayinfo("diffusedepth", ddepth).
It is also possible to entirely avoid evaluating the surface shader at the diffuse ray hit points. The indirectdiffuse() function has an optional parameter called "hitmode" (similar to occlusion()'s "hitmode") which can have two possible values: "primitive" and "surface". The default value is "surface", which means that the surface shader will be evaluated at the hit points. But if "hitmode" is set to "primitive", the object's Cs vertex variables are interpolated and used instead of running the shader. If the object has no Cs vertex variables, the object's Color attribute is used instead. Of course, the limitation of this approach is that textures and illumination on the surfaces is not taken into account (since only the shader can calculate those), but very nice effects can be obtained by assigning well-chosen Cs values to the vertices.
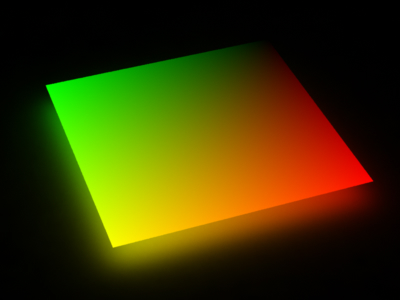
The figure below shows two examples of the use of the 'hitmode' parameter with indirectdiffuse(). The scene consists of a ground plane and square polygon floating above it. The square has a constant shader that returns Cs. The shader on the white ground plane computes indirect diffuse. The indirectdiffuse() parameter "hitmode" is set to "primitive". In the image to the left, the square has no Cs vertex variables, and the Color attribute (which is green) is used. In the image to the right, the square has Cs vertex variables corresponding to black, red, green, and yellow. For this particular scene, this gives the same result as if the "hitmode" was "shader", but faster.
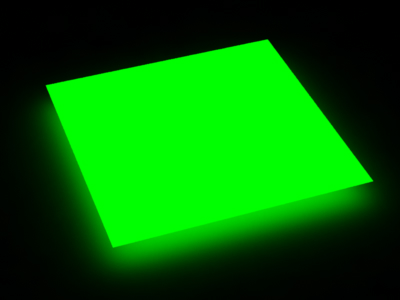 |
 |
To further speed up the color bleeding computation (a.k.a. single-bounce global illumination), it pays of to use a three-pass approach: 1) Render the scene with direct illumination and bake out the shading results in point clouds. 2) Convert the point clouds to brick maps. 3) Render the scene with a shader that calls indirectdiffuse() at directly visible points and just does a brick map lookup at final gather ray hit points.
    surface
    bake_direct_rad(string bakefile = "", displaychannels = "", texfile = "";
                    float Ka = 1, Kd = 1)
    {
      color irrad, tex = 1;
      normal Nn = normalize(N);

      /* Compute direct illumination (ambient and diffuse) */
      irrad = Ka*ambient() + Kd*diffuse(Nn);

      /* Lookup diffuse texture (if any) */
      if (texfile != "")
        tex = texture(texfile);

      /* Compute Ci and Oi */
      Ci = irrad * Cs * tex * Os;
      Oi = Os;

      /* Store Ci in point cloud file */
      bake3d(bakefile, displaychannels, P, Nn, "_diffuseradiance", Ci);
    }
The rib file for baking the direct illumination in the Cornell box
looks as follows:
    FrameBegin 1
      Format 400 400 1
      ShadingInterpolation "smooth"
      PixelSamples 4 4
      Display "cornell box direct illum" "it" "rgba"   # render image to 'it'
      Projection "perspective" "fov" 30
      Translate 0 0 5

      DisplayChannel "color _diffuseradiance"

      WorldBegin

        ShadingRate 4   # coarse shading points ok for this pass
        Attribute "cull" "hidden" 0   # to ensure occl. is comp. behind objects
        Attribute "cull" "backfacing" 0 # to ensure occl. is comp. on backsides
        Attribute "dice" "rasterorient" 0   # view-independent dicing
        Attribute "visibility" "int diffuse" 1   # make objects visible to diffuse rays
        Attribute "visibility" "int specular" 1  # make objects visible to refl. rays

        LightSource "cosinelight_rts" 1 "from" [0 1.0001 0] "intensity" 4

        # Matte box
        AttributeBegin
          Surface "bake_direct_rad" "displaychannels" "_diffuseradiance"
            "bakefile" "cornell_rad.ptc" "Kd" 0.8
          Color [1 0 0]
          Polygon "P" [ -1 1 -1  -1 1 1  -1 -1 1  -1 -1 -1 ]   # left wall
          Color [0 0 1]
          Polygon "P" [ 1 -1 -1  1 -1 1  1 1 1  1 1 -1 ]   # right wall
          Color [1 1 1]
          Polygon "P" [ -1 1 1  1 1 1  1 -1 1  -1 -1 1 ]   # back wall
          Polygon "P" [ -1 1 -1  1 1 -1  1 1 1  -1 1 1 ]   # ceiling
          Polygon "P" [ -1 -1 1  1 -1 1  1 -1 -1  -1 -1 -1 ]   # floor
        AttributeEnd

        # Tiny sphere indicating location of light source (~ "light bulb")
        AttributeBegin
          Attribute "visibility" "int diffuse" 0    # make light bulb invisible to rays
          Attribute "visibility" "int specular" 0   # make light bulb invisible to rays
          Attribute "visibility" "int transmission" 0   # and shadows
          Surface "constant"
          Translate 0 1 0
          Sphere 0.03  -0.03 0.03  360
        AttributeEnd

        Attribute "visibility" "int transmission" 1 # the spheres cast shadows
        Attribute "shade" "string transmissionhitmode" "primitive"

        # Left sphere (chrome; set to black in this pass)
        AttributeBegin
          Surface "constant"
          color [0 0 0]
          Translate -0.3 -0.7 0.3
          Sphere 0.3  -0.3 0.3  360
        AttributeEnd

        # Right sphere (matte)
        AttributeBegin
          Surface "bake_direct_rad" "displaychannels" "_diffuseradiance"
            "bakefile" "cornell_rad.ptc" "Kd" 0.8
          Translate 0.3 -0.7 -0.3
          Sphere 0.3  -0.3 0.3  360
        AttributeEnd
      WorldEnd
    FrameEnd
Note that we usually don't need the baked data points to be very dense, so the ShadingRate can be set higher than 1. In this example it is set to 4.
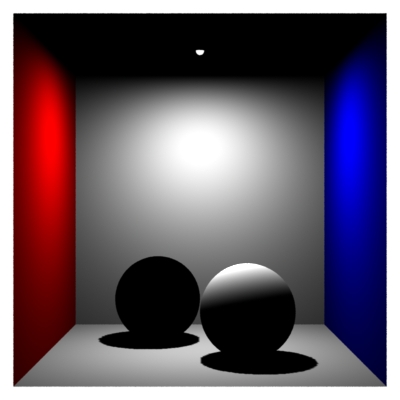
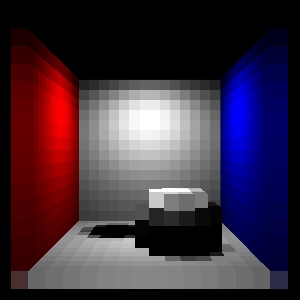
The rendered image just shows the direct illumination. It is similar to the image above, except that we've set the chrome sphere to be black in this pass:
 |
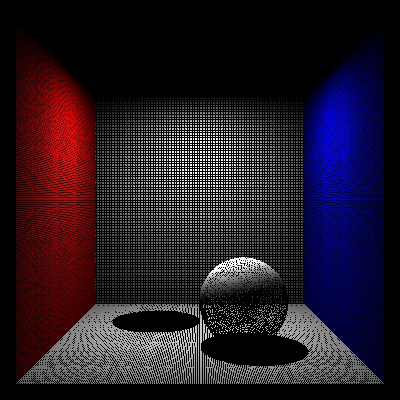
The generated point cloud file of baked radiance data is more interesting. The point cloud file contains approximately 153,000 points. The file can be viewed with ptviewer:
 |
Tip: it is sometimes preferable to bake out the centers of micropolygons instead of the actual shading points. This avoids overlapping points along shading grid edges and also reduces the number of baked points a bit.
brickmake cornell_rad.ptc cornell_rad.bkm
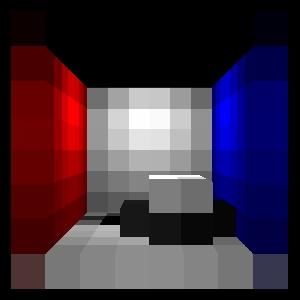
The resulting brick map file contains approximately 3100 bricks. The interactive brick map viewer brickviewer is great for inspecting the contents of a brick map. For example, here is a screen dump of cornell_rad.bkm levels 0, 1, and 2 shown in brickviewer:
 |
 |
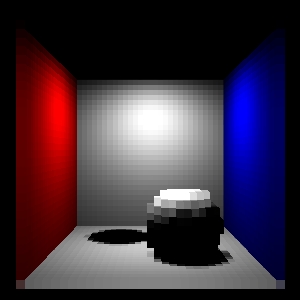 |
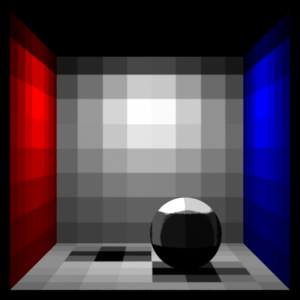
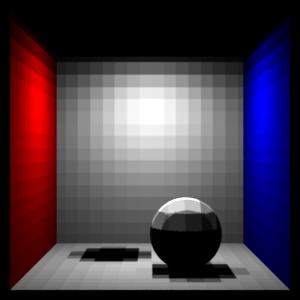
The different levels in a brick map can also be rendered using a shader calling texture3d() with different values of the "maxdepth" parameter -- as described in application note #39. The images below show the different levels of the brick map for the direct illumination radiance data:
|
|
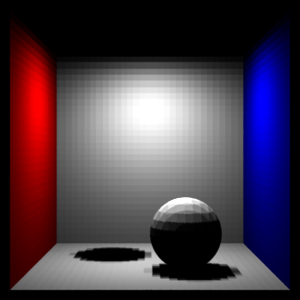
|
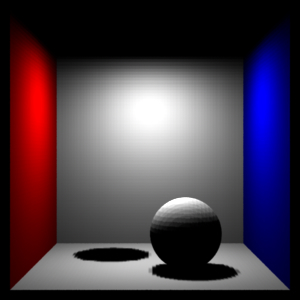
|
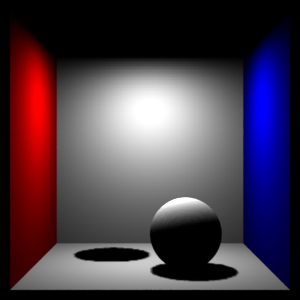
|
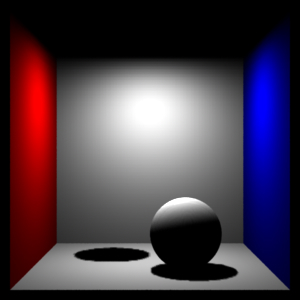
|
Now we are ready to render the final image of the single-bounce color bleeding. The shader does a final gather using indirectdiffuse(), and uses the texture3d function to look up the color resulting from direct illumination in the brick map.
    surface
    matte_1bounce(string brickmap = "", texfile = "";
                  float Ka = 1, Kd = 1;
                  float samples = 64, maxvariation = 0.02)
    {
      color rad = 1, irrad, tex = 1;
      normal Nn = normalize(N);
      uniform float maxddepth, ddepth;

      attribute("trace:maxdiffusedepth", maxddepth);
      rayinfo("diffusedepth", ddepth);

      if (ddepth == maxddepth) { /* max diffuse depth reached */
        /* Lookup in 3D radiance texture */
        texture3d(brickmap, P, Nn, "_diffuseradiance", rad);
        Ci = rad;
      } else { /* compute direct illum and shoot final gather rays */
        irrad = Ka*ambient()
              + Kd*diffuse(Nn)
              + Kd*indirectdiffuse(P, Nn, samples, "maxvariation", maxvariation);
        if (texfile != "")
          tex = texture(texfile);
        Ci = irrad * Cs * tex * Os;
      }

      Oi = Os;
    }
The rib file for rendering the Cornell box with single-bounce global illumination is:
    FrameBegin 1
      Format 400 400 1
      ShadingInterpolation "smooth"
      PixelSamples 4 4
      Display "cornell box 1 bounce" "it" "rgba"   # render image to 'it'
      Projection "perspective" "fov" 30
      Translate 0 0 5

      Option "limits" "brickmemory" 102400   # 100 MB brick cache

      WorldBegin

        LightSource "cosinelight_rts" 1 "from" [0 1.0001 0] "intensity" 4

        Attribute "visibility" "int diffuse" 1   # make objects visible to diffuse rays
        Attribute "visibility" "int specular" 1  # make objects visible to refl. rays
        Attribute "trace" "bias" 0.0001   # to avoid bright spot under sphere

        # Matte box
        AttributeBegin
          Surface "matte_1bounce" "brickmap" "cornell_rad.bkm" "Kd" 0.8
            "samples" 1024
          Color [1 0 0]
          Polygon "P" [ -1 1 -1  -1 1 1  -1 -1 1  -1 -1 -1 ]   # left wall
          Color [0 0 1]
          Polygon "P" [ 1 -1 -1  1 -1 1  1 1 1  1 1 -1 ]   # right wall
          Color [1 1 1]
          Polygon "P" [ -1 1 1  1 1 1  1 -1 1  -1 -1 1 ]   # back wall
          Polygon "P" [ -1 1 -1  1 1 -1  1 1 1  -1 1 1 ]   # ceiling
          Polygon "P" [ -1 -1 1  1 -1 1  1 -1 -1  -1 -1 -1 ]   # floor
        AttributeEnd

        # Tiny sphere indicating location of light source (~ "light bulb")
        AttributeBegin
          Attribute "visibility" "int diffuse" 0   # make light bulb invisible to rays
          Attribute "visibility" "int specular" 0   # make light bulb invisible to rays
          Attribute "visibility" "int transmission" 0   # and shadows
          Surface "constant"
          Translate 0 1 0
          Sphere 0.03  -0.03 0.03  360
        AttributeEnd

        Attribute "visibility" "int transmission" 1 # the spheres cast shadows
        Attribute "shade" "string transmissionhitmode" "primitive"

        # Left sphere (chrome)
        AttributeBegin
          Surface "mirror"
          Translate -0.3 -0.7 0.3
          Sphere 0.3  -0.3 0.3  360
        AttributeEnd

        # Right sphere (matte)
        AttributeBegin
          Surface "matte_1bounce" "brickmap" "cornell_rad.bkm" "Kd" 0.8
            "samples" 1024
          Translate 0.3 -0.7 -0.3
          Sphere 0.3  -0.3 0.3  360
        AttributeEnd
      WorldEnd
    FrameEnd
 |
This image is identical to the image in section 4, but is much faster to render. (In this example, the shader does not compute specular highlights, but in this pass that would be fine.)
In the previous example, only one bounce of indirect diffuse light was computed. To get multiple bounces in a reasonably efficient way, it is necessary to use photon maps. With the photon map method, we get multiple bounces essentially for free, since they are precomputed in the photon map; only the last bounce to the eye is expensive (as above). Furthermore, it is often the case that rendering using lookups in a global photon map is faster than computing color bleeding without the photon map. This is because the photon map lookups save us the time spent evaluating the (possibly ray traced) shadows at the ray hit points.
Generating the global photon map is very similar to the generation of a caustic photon map (described in the separate application note "Caustics in PRMan").
Photon maps are generated in a separate photon pass before rendering. To switch PRMan from normal rendering mode to photon map generation mode, the hider has to be set to "photon". For example:
Hider "photon" "emit" 300000
The total number of photons emitted from all light sources is specified by the "emit" parameter to the photon hider. PRMan will automatically analyze the light shaders and determine how large a fraction of the photons should be emitted from each light. Bright lights will emit a larger fraction of the photons than dim lights.
The name of the file that the global photon map should be stored in is specified by a "globalmap" attribute. For example:
Attribute "photon" "globalmap" "cornell.gpm"
If no "globalmap" name is given, no global photon map will be stored. (It is possible to generate global photon maps and caustic photon maps at the same time: just specify both "globalmap" and "causticmap" attributes. We're not doing that in the following examples to avoid potential confusion.)
To emit the photons, the light sources are evaluated and photons are emitted according to the light distribution of each light source. This means that, for example, “cookies”, “barn doors”, and textures in the light source shaders are taken into account when the photons are emitted. The light sources are specified as usual. For example:
LightSource "cosinelight_rts" 1 "from" [0 0.999 0] "intensity" 4
(There are currently some limitations on the distance fall-off for light sources: point lights and spot lights must have quadratic fall-off, solar lights must have no fall-off. This is because photons from a point or spot light naturally spread out, so that their densities have a quadratic fall-off, and photons from solar lights are parallel, so they inherently have no fall-off. We might implement a way around this in a future version of PRMan.)
When a photon has been emitted from a light, it is scattered (i.e. reflected and transmitted) through the scene. What happens when a photon hits an object depends on the shading model assigned to that object. All photons that hit a diffuse surface are stored in the global photon map — it doesn't matter whether the photon came from a light source, a specular surface, or a diffuse surface. Photons are not stored on surfaces with no diffuse component, though. The photon will be absorbed, reflected or transmitted according to the shading model and the color of the object. The shading model is set by an attribute:
Attribute "photon" "shadingmodel" ["matte"|"translucent"|"chrome"|"glass"|"water"|"transparent"]
Currently, matte, translucent, chrome, glass, water, and transparent are the built-in shading models used for photon scattering. These shading models use the color of the object (but opacity is ignored). If the color is set to [0 0 0] all photons that hit the object will be absorbed. (In the future, regular surface shaders will also be able to control photon scattering. Regular shaders are of course more flexible, but also less efficient than these built-in shading models.)
Let's look at an example that puts all this together. A simple rib file describing photon map generation in the same matte box with two spheres looks like this:
    FrameBegin 1
      Hider "photon" "emit" 300000
      Format 512 512 1   # not necessary but makes ptviewer able to display nicer
      Projection "perspective" "fov" 30   # ditto
      Translate 0 0 5

      WorldBegin
        LightSource "cosinelight_rts" 1 "from" [0 0.999 0] "intensity" 4

        Attribute "photon" "globalmap" "cornell.gpm"
        Attribute "trace" "maxspeculardepth" 5
        Attribute "trace" "maxdiffusedepth" 5

        # Matte box
        AttributeBegin
          Attribute "photon" "shadingmodel" "matte"
          Color [0.8 0 0]
          Polygon "P" [ -1 1 -1  -1 1 1  -1 -1 1  -1 -1 -1 ]   # left wall
          Color [0 0 0.8]
          Polygon "P" [ 1 -1 -1  1 -1 1  1 1 1  1 1 -1 ]   # right wall
          Color [0.8 0.8 0.8]
          Polygon "P" [ -1 -1 1  1 -1 1  1 -1 -1  -1 -1 -1 ]   # floor
          Polygon "P" [ -1 1 -1  1 1 -1  1 1 1  -1 1 1 ]   # ceiling
          Polygon "P" [ -1 1 1  1 1 1  1 -1 1  -1 -1 1 ]   # back wall
        AttributeEnd

        # Back sphere (chrome)
        AttributeBegin
          Attribute "photon" "shadingmodel" "chrome"
          Translate -0.3 -0.7 0.3
          Sphere 0.3  -0.3 0.3  360
        AttributeEnd

        # Front sphere (matte)
        AttributeBegin
          Attribute "photon" "shadingmodel" "matte"
          Translate 0.3 -0.7 -0.3
          Sphere 0.3  -0.3 0.3  360
        AttributeEnd
      WorldEnd
    FrameEnd
A photon map is a special kind of point cloud file (the data at each point are photon power, photon incident direction, and now also the diffuse surface color) and can be displayed with the interactive point cloud display application ptviewer. Ptviewer can display photon maps (and other point clouds files) in three modes: points, normals, or disks. Ptviewer is very useful for navigating around the photon map (rotate, zoom, etc.) to gain a better understanding of the photon distribution.
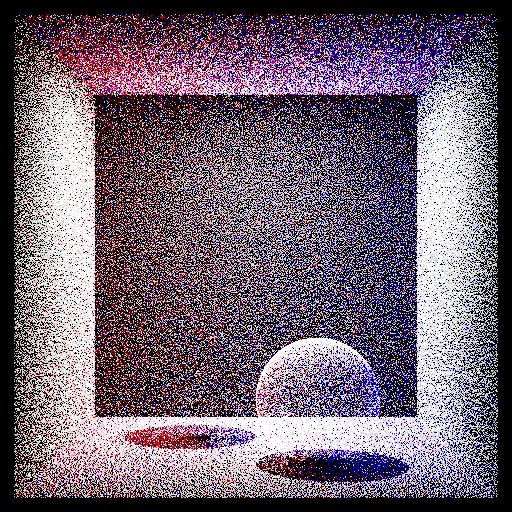
The photon powers in the photon map cornell.gpm are shown below (displayed with ptviewer -multiply 10000 since the stored photon powers are very dim):
|
Note that the color of each photon is the color it has as it hits the surface, i.e. before surface reflection can change its color. Also note that photons are only deposited on diffuse surfaces; there are no photons on the chrome sphere.
NOTE: In PRMan 13.0 the photon map workflow has changed a bit: The photon map now contains the diffuse surface color at each photon position as well as the usual photon map data. And ptfilter now computes radiosity estimates instead of irradiance estimates. This change makes shader evaluation simpler at the final gather ray hit points, but requires that the final gather shader is simplified. (If not, the irradiance will be multiplied twice by the surface color.)
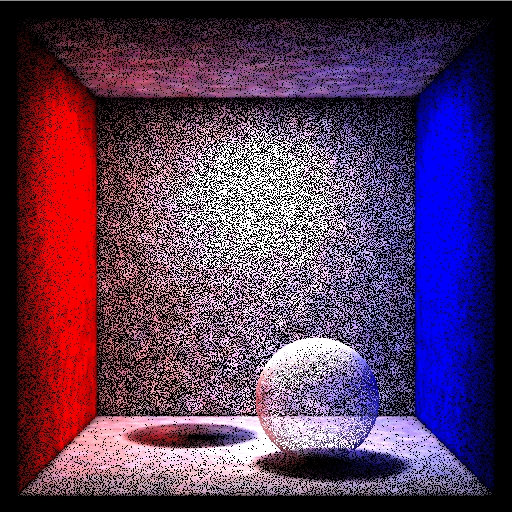
In the next step, the radiosity value is computed at all photon positions. Each of these radiosity values are estimated from the density and power of the nearest photons, and the stored diffuse surface color. This is done using the ptfilter program:
ptfilter -photonmap -nphotons 100 cornell.gpm cornell_rad.ptcPtviewer can show the computed radiosity values at the photon positions. Here is the radiosity point cloud:
|
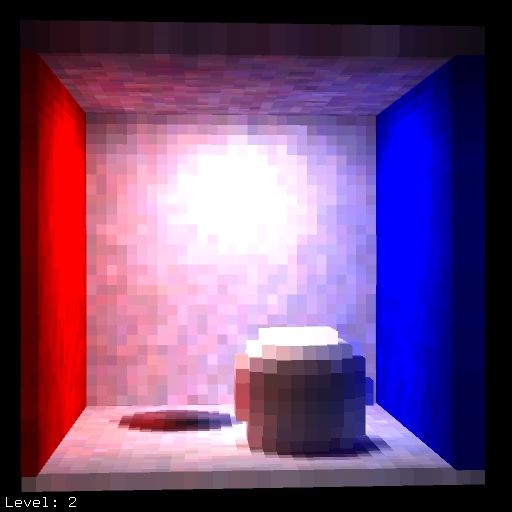
brickmake cornell_rad.ptc cornell_rad.bkm
The brick map can be inspected using the interactive program brickviewer. For example, here is a snapshot of the brick map's level 2:
|
A shader can get the global illumination color using the texture3d function. For example, a surface shader might call like this:
    success = texture3d(filename, P, N, "_radiosity", rad);
    Ci = Kd * rad;
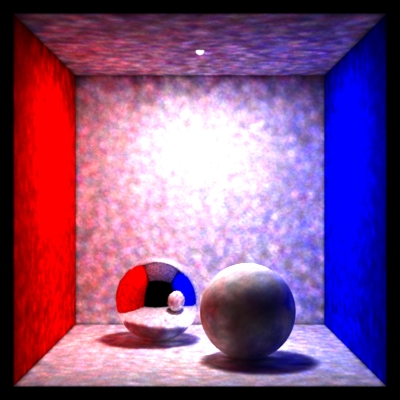
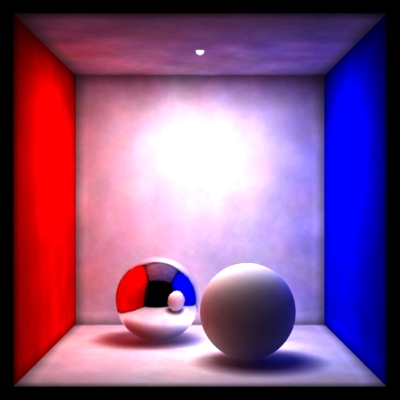
Here filename is the name of the brick map file, P is the position at which to estimate the global illumination, N is the normalized surface normal at P, and irrad is the variable that the texture lookup result is assigned to. Note that this photon map lookup gives a (rough) estimate of the total illumination at each point, so it would be wrong to add direct illumination using, for example, an illuminance loop or the diffuse function. Unfortunately, images rendered in this way have too much noise. Global photon maps simply have too much “splotchiness” (low frequency noise) in them to be acceptable for direct rendering. Two examples are shown below. They use 50 and 500 photons (the -nphotons parameter to ptfilter) to estimate the illumination, respectively.
|
|
As these images show, increasing the number of photons used to estimate the indirect illumination decreases the noise but also blurs the illumination. In order to get crisp, noise-free images, an extraordinarily large number of photons would have to be stored in the photon map. This is not viable with current technology.
Instead, we have to use the indirectdiffuse function again — similar to the previous sections. The difference is that the shader now has to look up the irradiance (with a texture3d call) if the max diffuse ray depth (usually 1) has been reached.
As above, the indirectdiffuse function can be in a surface shader or in a light source shader. For example, we can use the following surface shader:
    surface matte_finalgather(uniform string filename = "";
                              float Kd = 1, samples = 64, maxvariation = 0.02)
    {
      color irrad = 0, radio = 0;
      normal Nn = normalize(N);
      uniform float maxddepth, ddepth;

      attribute("trace:maxdiffusedepth", maxddepth);
      rayinfo("diffusedepth", ddepth);

      if (ddepth == maxddepth) { // brick map lookup
        // Lookup in 3D radiosity texture
        texture3d(filename, P, Nn, "_radiosity", radio);
        Ci = radio;
        Oi = 1;
      } else { // shoot final gather rays
        irrad = diffuse(Nn)
              + indirectdiffuse(P, Nn, samples, "samplebase", 0.1,
                                "maxvariation", maxvariation);
        Ci = Kd * Cs * irrad;
        Ci *= Os; // premultiply opacity
        Oi = Os;
      }
    }
Here's a rib file for rendering the box using the radiosity brick map
"cornell_rad.bkm":
    FrameBegin 1
      Format 400 400 1
      ShadingInterpolation "smooth"
      PixelSamples 4 4
      Display "cornell box with spheres" "it" "rgba"   # render image to 'it'
      Projection "perspective" "fov" 30
      Translate 0 0 5

      Option "limits" "brickmemory" 102400   # 100 MB brick cache

      WorldBegin
        LightSource "cosinelight_rts" 1 "from" [0 1.0001 0] "intensity" 4

        Attribute "visibility" "int diffuse" 1    # make objects visible to diffuse rays
        Attribute "visibility" "int specular" 1   # make objects visible to refl. rays
        Attribute "trace" "bias" 0.0001   # to avoid bright spot under sphere

        Sides 1

        Surface "matte_finalgather" "filename" "cornell_rad.bkm"
          "Kd" 0.8 "samples" 1024 "maxvariation" 0.02

        # Matte box
        AttributeBegin
          Color [1 0 0]
          Polygon "P" [ -1 1 -1  -1 1 1  -1 -1 1  -1 -1 -1 ]   # left wall
          Color [0 0 1]
          Polygon "P" [ 1 -1 -1  1 -1 1  1 1 1  1 1 -1 ]   # right wall
          Color [1 1 1]
          Polygon "P" [ -1 1 1  1 1 1  1 -1 1  -1 -1 1 ]   # back wall
          Polygon "P" [ -1 1 -1  1 1 -1  1 1 1  -1 1 1 ]   # ceiling
          Polygon "P" [ -1 -1 1  1 -1 1  1 -1 -1  -1 -1 -1 ]   # floor
        AttributeEnd

        # Tiny sphere indicating location of light source (~ "light bulb")
        AttributeBegin
          Attribute "visibility" "int diffuse" 0   # make light bulb invisible to rays
          Attribute "visibility" "int specular" 0   # make light bulb invisible to rays
          Attribute "visibility" "int transmission" 0   # and shadows
          Surface "constant"
          Translate 0 1 0
          Sphere 0.03  -0.03 0.03  360
        AttributeEnd

        Attribute "visibility" "int transmission" 1 # the spheres cast shadows
        Attribute "shade" "string transmissionhitmode" "primitive"

        # Left sphere (chrome)
        AttributeBegin
          Surface "mirror"
          Translate -0.3 -0.7 0.3
          Sphere 0.3  -0.3 0.3  360
        AttributeEnd

        # Right sphere (matte)
        AttributeBegin
          Translate 0.3 -0.7 -0.3
          Sphere 0.3  -0.3 0.3  360
        AttributeEnd
      WorldEnd
    FrameEnd
Below we see two images of the box. On the left, the box has only direct illumination and one bounce of indirect illumination (this is the image from section 4.2.3). On the right, the box has a full global illumination solution.
 |
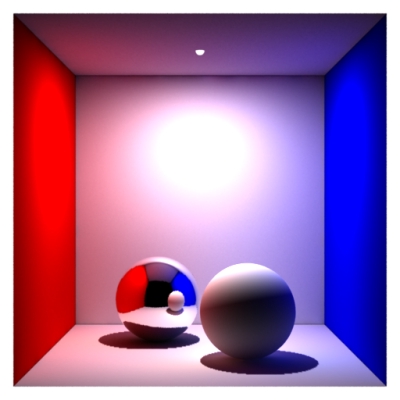 |
Again, changing the maxvariation parameter to a value larger than 0 enables interpolation of the indirect illumination. This will typically speed up the rendering significantly.
Note that, since photon maps are generated in a separate pass, the scene used for photon map generation can be different from the rendered scene. This gives a lot of possibilities to “cheat” and alter the indirect illumination. Also, the indirect illumination computed using the photon map can be used just as a basis for the rendering — nothing prevents us from adding more direct lights for localized effects, cranking the color bleeding up or down, etc.
Sampling the hemisphere above a point is a very expensive operation since it involves tracing many rays, potentially many shader evaluations, etc. To save time, we interpolate ambient occlusion and soft indirect illumination between shading points whenever possible, rather than sampling the hemisphere. To save more time, we can also reuse computed occlusion and indirect illumination from one frame to the next in animations. This is often referred to as baking the occlusion and indirect illumination. If the occlusion or indirect illumination doesn't change significantly on some objects during an animation, we can precompute the occlusion and indirect illumination on these objects once and for all, and use those values in all frames.
Precomputing and reusing computed data in multiple renderings or multiple frames is useful to speed up ambient occlusion and indirect illumination (environment illumination, color bleeding, and photon map global illumination). We call such data files occlusion point cloud files or irradiance point cloud files, depending on which data they contain.
There are no restrictions on the naming of these files. One convenient convention is to use the suffix ".ptc" for point cloud files.
Point cloud files can be generated by the bake3d() function, and brick map files can be read by the texture3d() function.
A few “tricks” are necessary to generate an occlusion/irradiance point cloud and brick map for later use in rendering of animations:
Tip: Be careful about which direction the normals face when generating the occlusion and irradiance data. If the normals face opposite when baking vs. lookup, no data will be found. Also, if the normals are unintentionally pointing inside closed objects (either because the object was modeled that way or because faceforward() was called), full occlusion will be computed.
Tip: If the objects have displacements, make sure to turn on the "trace" "displacements" option . This is necessary since the occlusion is computed using ray tracing.
Also see the section on common pitfalls and known issues in the 3D baking application note (#39).During the generation of the point cloud, values are written out for each shading point, so the density of the point cloud data is determined by the image resolution and shading rate.
The interactive application ptviewer is helpful for navigating (rotate, zoom, etc.) around the point cloud data to gain a better understanding of the distribution and values of the occlusion and irradiance data.
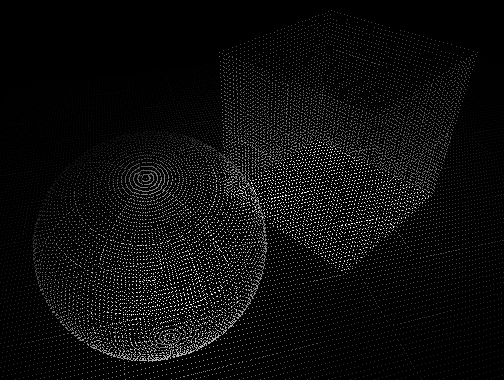
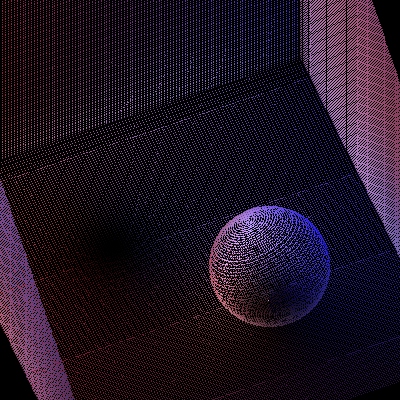
Here are images of occlusion (left) and irradiance (right):
 |
 |
The following shader computes ambient occlusion values with a gather loop and bakes it using the bake3d function. (It is much faster and more convenient to use the occlusion() function to generate ambient occlusion data than to use a gather loop as shown here. To do this, simply replace the gather loop in the bake_occ shader with a call to the occlusion() function.)
    surface
    bake_occ(string filename = "", displaychannels = "", coordsys = "";
             float samples = 64)
    {
      normal Nn = normalize(N);

      // Compute occlusion at P (it would be more efficient to call occlusion())
      float hits = 0;
      gather ("illuminance", P, Nn, PI/2, samples, "distribution", "cosine") {
        hits += 1;
      }
      float occ = hits / samples;

      // Bake occlusion in point cloud file (in 'coordsys' space)
      bake3d(filename, displaychannels, P, Nn, "coordsystem", coordsys,
             "_occlusion", occ);

      // Set Ci and Oi
      Ci = (1 - occ) * Cs * Os;
      Oi = Os;
    }
The following is a simple rib file for generating three occlusion point cloud files: wall.ptc, floor.ptc, and hero.ptc.
    FrameBegin 0

      Format 300 300 1
      ShadingInterpolation "smooth"
      PixelSamples 4 4
      Display "bake_occ" "it" "rgba"
      Projection "perspective" "fov" 30
      Translate 0 0 5

      DisplayChannel "float _occlusion"

      WorldBegin

        ShadingRate 4   # to avoid too many points in point cloud file
        Attribute "cull" "hidden" 0   # to ensure occl. is comp. behind objects
        Attribute "cull" "backfacing" 0 # to ensure occl. is comp. on backsides
        Attribute "dice" "rasterorient" 0   # view-independent dicing
        Attribute "visibility" "int diffuse" 1   # make objects visible to rays
        Attribute "visibility" "int specular" 1   # make objects visible to rays

        # Wall
        AttributeBegin
          Surface "bake_occ" "filename" "wall.ptc" "displaychannels" "occlusion"
            "samples" 1024
          Polygon "P" [ -1 1 1  1 1 1  1 -1.1 1  -1 -1.1 1 ]
        AttributeEnd

        # Floor
        AttributeBegin
          Surface "bake_occ" "filename" "floor.ptc" "displaychannels" "occlusion"
            "samples" 1024
          Polygon "P" [ -0.999 -1 1  0.999 -1 1  0.999 -1 -0.999  -0.999 -1 -0.999]
        AttributeEnd

        # "Hero character": cylinder, cap, and sphere
        AttributeBegin
          Translate -0.3 -1 0   # this is the local coord sys of the "hero"
          CoordinateSystem "hero_coord_sys0"
          Surface "bake_occ" "filename" "hero.ptc" "displaychannels" "_occlusion"
            "coordsys" "hero_coord_sys0" "samples" 1024
          AttributeBegin
            Translate 0 0.3 0
            Scale 0.3 0.3 0.3
            ReadArchive "nurbscylinder.rib"
          AttributeEnd
          AttributeBegin
            Translate 0 0.6 0
            Rotate -90 1 0 0
            Disk 0 0.3 360
          AttributeEnd
          AttributeBegin
            Translate 0 0.9 0
            Sphere 0.3 -0.3 0.3 360
          AttributeEnd
        AttributeEnd

      WorldEnd
    FrameEnd
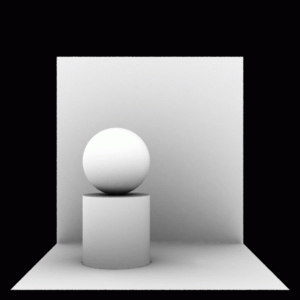
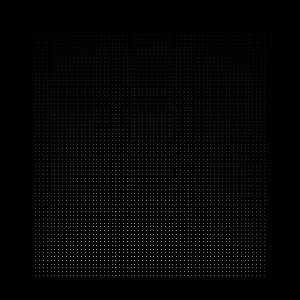
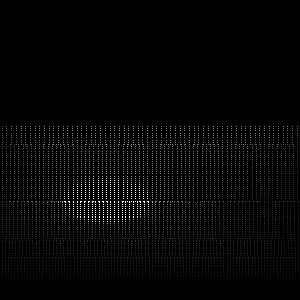
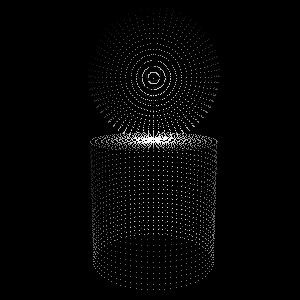
Running this rib file produces the image and three point cloud files shown below. Note that the images show the occlusion (white meaning full occlusion, black meaning no occlusion) while the image is rendered using 1 minus occlusion.
 |
 |
 |
 |
Next, we want to reuse as much of these occlusion data as possible in an animation where the camera moves and the "hero character" (the cylinder with a sphere on top of it) moves to the right. The back wall is static and the “true” occlusion changes so little that we can reuse the occlusion baked in wall.ocf. The “hero” moves perpendicular to the wall and ground plane, and deforms a bit. His occlusion (in hero.ocf) can also be reused without introducing too much of an error. It is only the floor's occlusion that cannot be reused: moving the hero changes the occlusion on the floor too much — reusing the baked occlusion would leave a black occluded spot on the ground at the place where the hero initially was.
Creating brick maps of the occlusion data for the wall and hero is done using the brickmake program:
  brickmake wall.ptc wall.bkm
  brickmake hero.ptc hero.bkm
The read_occ shader reads these data with the texture3d() function:
    surface
    read_occ(string filename = "", coordsys = "")
    {
      normal Nn = normalize(N);
      float occ = 0;

      // Read occlusion from brick map file (in 'coordsys' space)
      texture3d(filename, P, Nn, "coordsystem", coordsys,
                "_occlusion", occ);

      // Set Ci and Oi
      Ci = (1 - occ) * Cs * Os;
      Oi = Os;
    }
The read_occ shader can be used if the objects undergo rigid transformations. For deforming objects, it is simple to write a similar shader (called read_occ_Pref) that reads the occlusion values at reference points. The only difference from the previous shader is that Prefs are passed in as a shader parameter (varying point Pref = (0,0,0)) and Pref is used instead of P in the texture3d() lookup. The read_occ_Pref shader is useful for reusing occlusion values on deforming objects with reference points.
Here is the rib file for the same scene with the camera moved and the hero character moved and deformed.
    FrameBegin 3

      Format 300 300 1
      PixelSamples 4 4
      ShadingInterpolation "smooth"
      Display "read_occ" "it" "rgba"
      Projection "perspective" "fov" 30
      Translate 0 0 5
      Rotate -20 1 0 0

      DisplayChannel "float _occlusion"

      WorldBegin

        Attribute "visibility" "int diffuse" 1
        Attribute "visibility" "int specular" 1
        Sides 1

        # Wall
        AttributeBegin
          Surface "read_occ" "filename" "wall.bkm"
          Polygon "P" [ -1 1 1  1 1 1  1 -1 1  -1 -1 1 ]
        AttributeEnd

        # Floor -- no reuse here
        AttributeBegin
          Surface "bake_occ" "filename" "floor.ptc" "displaychannels" "_occlusion"
            "samples" 1024
          Polygon "P" [ -1 -1 1  1 -1 1  1 -1 -1  -1 -1 -1 ]
        AttributeEnd

        # Cylinder + cap + sphere
        AttributeBegin
          Translate 0.3 -1 0
          CoordinateSystem "hero_coord_sys3"
          Surface "read_occ" "filename" "hero.bkm"
            "coordsys" "hero_coord_sys3"
          AttributeBegin
            Surface "read_occ_Pref" "filename" "hero.bkm"
              "coordsys" "hero_coord_sys3"
            Translate 0 0.3 0
            Scale 0.3 0.3 0.3
            ReadArchive "/nurbscylinder_deformed.rib"
          AttributeEnd
          AttributeBegin
            Translate 0 0.6 0
            Rotate -90 1 0 0
            Disk 0 0.3 360
          AttributeEnd
          AttributeBegin
            Translate 0 0.9 0
            Sphere 0.3 -0.3 0.3 360
          AttributeEnd
        AttributeEnd

      WorldEnd
    FrameEnd
The rib file nurbscylinder_deformed contains a deformed NURBS cylinder with Pref points corresponding to the undeformed NURBS cylinder.
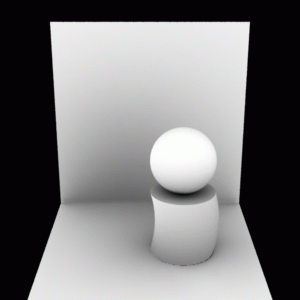
Running the rib file above produces the image below much faster than if the occlusion values weren't reused.
 |
Tip: when baking ambient occlusion, it often pays off to not bake points with full occlusion. If a point is fully occluded, we will never get to see it, no matter what the camera point and direction are. This reduces the size of the point cloud file, and can also help avoid problems on very thin walls where the inside is fully occluded but the outside is not.
Consider again the scene with the “hero” character in a room. We'll now replace the shaders above with shaders that bake and reuse irradiance instead of occlusion. And let's add a large bright green patch to the scene. All other surfaces are white.
The shader bake_indidiff computes indirect illumination using the indirectdiffuse function and bakes it using the bake3d function:
    surface
    bake_indidiff(string filename = "", displaychannels = "", coordsys = "";
                  float samples = 64, maxvariation = 0.02, maxdist = 1e30)
    {
      normal Nn = normalize(N);
      color indidiff = 0;
      uniform float ddepth;

      rayinfo("diffusedepth", ddepth);

      if (ddepth == 0) {
        indidiff = indirectdiffuse(P, Nn, samples, "maxvariation", maxvariation,
                                   "maxdist", maxdist);
        bake3d(filename, displaychannels, P, Nn, "coordsystem", coordsys,
               "_indirectdiffuse", indidiff);
      }

      Ci = indidiff * Cs * Os;
      Oi = Os;
    }
Note that we had to take special care not to bake at the points where
the indirectdiffuse rays hit, i.e. when the diffuse ray depth is 1.
(This is not an issue when we're only computing ambient occlusion
since occlusion does not require the evaluation of the shader at the
ray hit points.)
Here is the rib file for generating three point cloud files with irradiance data: wall.ptc, floor.ptc, and hero.ptc.
    FrameBegin 0

      Format 300 300 1
      ShadingInterpolation "smooth"
      PixelSamples 4 4
      Display "bake_indidiff" "it" "rgba"
      Projection "perspective" "fov" 30
      Translate 0 0 5

      DisplayChannel "color _indirectdiffuse"

      WorldBegin

        ShadingRate 4   # to avoid too many values in point cloud file
        Attribute "cull" "hidden" 0   # to ensure occl. is comp. behind objects
        Attribute "cull" "backfacing" 0 # to ensure occl. is comp. on backsides
        Attribute "dice" "rasterorient" 0   # view-independent dicing
        Attribute "visibility" "int diffuse" 1   # make objects visible to rays
        Attribute "visibility" "int specular" 1   # make objects visible to rays

        # Bright green wall
        AttributeBegin
          Color [0 1.5 0]
          Surface "constant"
          Polygon "P" [ -1 1 -1  -1 1 1  -1 -1 1  -1 -1 -1 ]
        AttributeEnd

        # Wall
        AttributeBegin
          Surface "bake_indidiff" "filename" "wall.ptc"
            "displaychannels" "_indirectdiffuse" "samples" 1024
          Polygon "P" [ -1 1 1  1 1 1  1 -1.1 1  -1 -1.1 1 ]
        AttributeEnd

        # Floor
        AttributeBegin
          Surface "bake_indidiff" "filename" "floor.ptc"
            "displaychannels" "_indirectdiffuse" "samples" 1024
          Polygon "P" [ -0.999 -1 1  0.999 -1 1  0.999 -1 -0.999  -0.999 -1 -0.999]
        AttributeEnd

        # "Hero character": cylinder, cap, and sphere
        AttributeBegin
          Attribute "irradiance" "maxpixeldist" 5.0
          Translate -0.3 -1 0   # this is the local coord sys of the "hero"
          CoordinateSystem "hero_coord_sys0"
          Surface "bake_indidiff" "filename" "hero.ptc"
            "displaychannels" "_indirectdiffuse" "coordsys" "hero_coord_sys0"
            "samples" 1024
          AttributeBegin
            Translate 0 0.3 0
            Scale 0.3 0.3 0.3
            ReadArchive "nurbscylinder.rib"
          AttributeEnd
          AttributeBegin
            Translate 0 0.6 0
            Rotate -90 1 0 0
            Disk 0 0.3 360
          AttributeEnd
          AttributeBegin
            Translate 0 0.9 0
            Sphere 0.3 -0.3 0.3 360
          AttributeEnd
        AttributeEnd

      WorldEnd
    FrameEnd
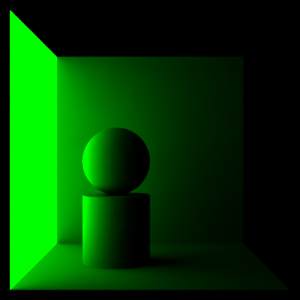
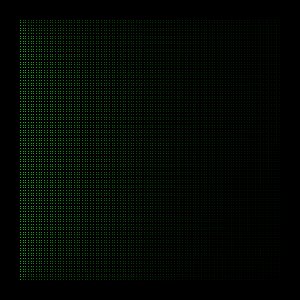
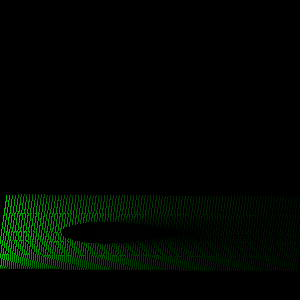
The images below are the rendered image along with the three generated point cloud files.
 |
 |
 |
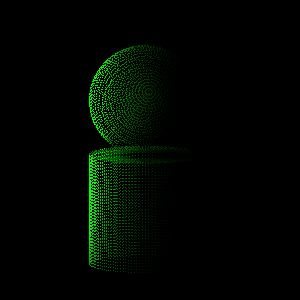 |
Next we have to create a brick map representation of the irradiance values in the point clouds. This is done with brickmake:
    brickmake wall.ptc wall.bkm
    brickmake hero.ptc hero.bkm
Finally we are ready to reuse the baked irradiance values. Here is a shader that calls the texture3d function.
    surface
    read_indidiff(string filename = "", coordsys = "")
    {
      normal Nn = normalize(N);
      color indidiff = 0;

      // Read indirect diffuse from brick map file (in 'coordsys' space)
      texture3d(filename, P, Nn, "coordsystem", coordsys,
                "_indirectdiffuse", indidiff);

      // Set Ci and Oi
      Ci = indidiff * Cs * Os;
      Oi = Os;
    }
It is simple to write a similar shader using Pref points (for the deformed cylinder).
The following is the scene description for rerendering the scene from a different camera viewpoint and with the “hero” moved away from the bright green patch. We reuse the baked irradiance on the wall and “hero” but cannot reuse the irradiance on the floor since the dark spot would be in the wrong place.
    FrameBegin 3

      Format 300 300 1
      PixelSamples 4 4
      ShadingInterpolation "smooth"
      Display "read_indidiff" "it" "rgba"
      Projection "perspective" "fov" 30
      Translate 0 0 5
      Rotate -20 1 0 0

      DisplayChannel "color _indirectdiffuse"

      WorldBegin

        Attribute "visibility" "int diffuse" 1
        Attribute "visibility" "int specular" 1

        # Bright green wall
        AttributeBegin
          Color [0 1.5 0]
          Surface "constant"
          Polygon "P" [ -1 1 -1  -1 1 1  -1 -1 1  -1 -1 -1 ]
        AttributeEnd

        # Wall
        AttributeBegin
          Surface "read_indidiff" "filename" "wall.bkm"
          Polygon "P" [ -1 1 1  1 1 1  1 -1.1 1  -1 -1.1 1 ]
        AttributeEnd

        # Floor -- no reuse here
        AttributeBegin
          Surface "bake_indidiff" "filename" "floor.ptc"
            "displaychannels" "_indirectdiffuse" "samples" 1024
          Polygon "P" [ -1 -1 1  1 -1 1  1 -1 -1  -1 -1 -1 ]
        AttributeEnd

        # Cylinder + cap + sphere
        AttributeBegin
          Translate 0.3 -1 0
          CoordinateSystem "hero_coord_sys3"
          Surface "read_indidiff" "filename" "hero.bkm"
            "coordsys" "hero_coord_sys3"
          AttributeBegin
            Surface "read_indidiff_Pref" "filename" "hero.bkm"
              "coordsys" "hero_coord_sys3"
            Translate 0 0.3 0
            Scale 0.3 0.3 0.3
            ReadArchive "nurbscylinder_deformed.rib"
          AttributeEnd
          AttributeBegin
            Translate 0 0.6 0
            Rotate -90 1 0 0
            Disk 0 0.3 360
          AttributeEnd
          AttributeBegin
            Translate 0 0.9 0
            Sphere 0.3 -0.3 0.3 360
          AttributeEnd
        AttributeEnd

      WorldEnd
    FrameEnd
Here is the resulting image:
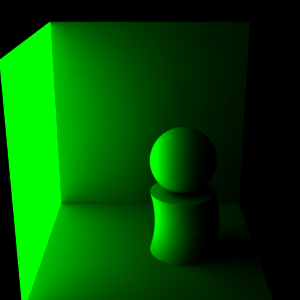 |
Note that the green irradiance on the “hero” is actually too bright and wraps around the cylinder and sphere too far, since he is now much further away from the bright green patch than when the irradiance was computed. It is a matter of judgment whether this is acceptable. A simple adjustment is to decrease the weight of the irradiance on the “hero”. The amount that the green illumination wraps around the cylinder and sphere would still be wrong, but that may be less objectionable than the incorrect brightness.
If we want to render an animation where the camera flies over a scene or zooms in or out, we need different densities of occlusion/irradiance data in different parts of the scene. This can be accomplished by generating point cloud files for a few key frames, and then creating a single brick map from all of the point cloud files (using brickmake).
Here is an example of three occlusion files computed for three different camera positions in a dragon scene.
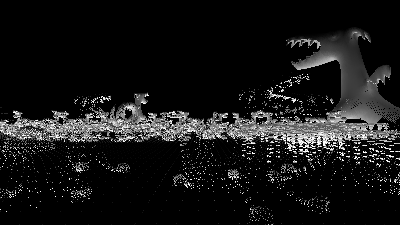 |
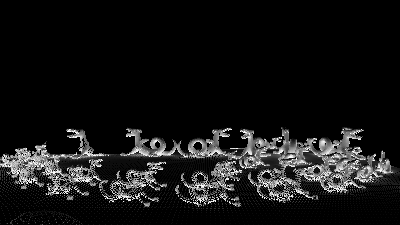 |
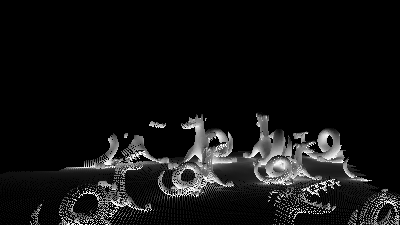 |
These occlusion point cloud files can then be merged into one brick map using the brickmake program:
brickmake dragons1.ptc dragons2.ptc dragons3.ptc dragonsall.bkm
In the combined file, the occlusion data are dense where they need to be, and sparse elsewhere. An entire animation can be rendered with this combined occlusion brick map. Rendering the frames is fast, since no new occlusion is computed; it is just looked up in the brick map file.
The same approach can be used for baking irradiance for a fly-through.
Point cloud files can be quite big. However, gzip compression works really well on these files: the file sizes are typically reduced by 75-90%. PRMan, brickmake, and ptviewer can read gzipped files directly.
Q: Which global illumination method do you recommend?
A: We recommend either baking direct illumination or using photon mapping. Then generate brick maps representing the illumination, and render with final gathering to get high-quality global illumination. Both methods are multi-pass methods. The first method only computes a single bounce of global illumination, but in many cases that is fully sufficient. Photon mapping computes full, multi-bounce global illumination.
Q: The ambient occlusion (or indirect diffuse illumination) looks splotchy. What parameters can I change to make this go away?
A: First increase the number of samples until it doesn't seem to decrease the splotches. Then decrease the maxvariation parameter until the splotches disappear. (Optional last step: try to decrease the number of samples a bit to see if the splotches reappear.)
Q: I'm computing ambient occlusion (or indirect diffuse illumination) on a displaced surface. The ambient occlusion (or indirect diffuse illumination) looks really strange and splotchy. Is there something I need to do?
A: Make sure that the attribute "trace" "displacements" is on. (The default is “off”.) The occlusion() and indirectdiffuse() functions use ray tracing, and if the objects are displaced, the ray tracing needs to take the displacements into account. (This does not apply if you are just reading baked occlusion or irradiance from a brick map — in that case ray tracing is not used.)
Q: My point cloud files are really huge. Is there any way to make them smaller?
A: Gzip compression works really well on these files; the file sizes are typically reduced by 75-90%. PRMan, brickmake, and ptviewer can read gzipped point cloud files directly.
Q: When rendering baked ambient occlusion or indirect diffuse illumination using texture3d(), are the attributes "irradiance" "maxerror" and "irradiance" "maxpixeldist" used for anything?
A: No. Since all occlusion and indirect diffuse information is read from the brick map file, maxerror and maxpixeldist are ignored.
Q: What is the difference between a caustic photon map and a global photon map?
A: The caustic photon map only contains photons that hit a diffuse surface coming from a specular surface. The global photon map contains all photons that hit a diffuse surface (no matter where they came from). So if both maps are generated at the same time for a given scene, the photons in the caustic photon map are a subset of the photons in the global photon map.
Q: I'm using a global photon map, but my picture shows no indirect illumination. Why?
A: First check that the global photon map has the right name and actually has photons in it. Inspect the photon map with sho or ptviewer. Also make sure that the surfaces where the indirect illumination should come from have a globalmap attribute. Note that photons from point and spot lights inherently have a square fall-off. So if the lights you use for direct illumination have linear or no fall-off, the indirect illumination can be very dim compared to the direct illumination.
Q: I'm only interested in one bounce indirect illumination. Which method should I use?
A: The difference is what the surface shader should do when evaluated where the indirectdiffuse sample rays hit. If there is no precomputed illumination map, the shader needs to evaluate illumination from many light sources (including shadows), do texture map lookups, etc. With a precomputed radiance brick map, the shader can skip the evaluation of illumination and textures; it can just look up in the radiance brick map using a single call of texture3d(). It is much faster to do a texture3d() lookup than to evaluate illumination from many light sources. So we recommend the three-pass workflow described in section 4.2.
More information about ambient occlusion can be found in:
Information about PRMan's ray tracing functionality can be found in the application note "A tour of ray traced shading in PRMan". More details about PRMan's 3D baking approach can be found in the application note "Baking 3D Textures: Point Clouds and Brick Maps". PRMan's caustic rendering (that also uses the photon map method) is described in the application note "Caustics".
| Pixar
Animation Studios
|