Caustics
April 2002 (Revised August 2005)
![]()
CausticsApril 2002 (Revised August 2005) |
|
In computer graphics, we use the term caustic to denote light that has been specularly reflected or refracted onto a diffuse surface. Examples of real life caustics are the shimmering waves of light at the bottom of a swimming pool or the heart-shaped reflection inside a coffee-cup.
In order to get a caustic effect in PRMan, the scene needs to have both specular and diffuse objects, and the light sources have to be set up such that light from the light sources hit a specular object and is then reflected or refracted onto a diffuse object.
Caustics are computed in two passes. In the first pass, photons are emitted from the light sources, traced through the scene, and stored in a caustic photon map. The second pass is rendering, and the caustic photon map is used to compute the caustic color at different shading points.
Hider "photon" "emit" 1000000
The total number of photons emitted from all light sources is specified
by the "emit" parameter to the photon hider. PRMan will automatically
analyze the light shaders and determine how large a fraction of the
photons should be emitted from each light. Bright lights will emit
a larger fraction of the photons than dim lights.
The name of the file that the caustic photon map should be stored in is specified by a "causticmap" attribute, for example:
Attribute "photon" "causticmap" "causticrefl.cpm"
If no "causticmap" name is given, no caustic photons will be stored.
Usually, a single caustic map should be used for the entire scene,
but for special purposes, different objects can have different caustic
photon maps.
To emit the photons, the light sources are evaluated and photons are emitted according to the light distribution of each light source. This means that for example ``cookies'', ``barn doors'', and textures in the light source shaders are taken into account when the photons are emitted. The light sources are specified as usual, for example:
LightSource "spotlight_rts" 1 "from" [-4 7 -7] "to" [0 0 0] "intensity" 100 "coneangle" 0.2
(There are currently some limitations on the distance fall-off for
light sources: point lights and spot lights must have quadratic
fall-off, solar lights must have no fall-off. This is because photons
from a point or spot light naturally spread out so that their density
have a quadratic fall-off, and photons from solar lights are parallel
so they inherently have no fall-off. We might implement a way around
this in a future version of PRMan.)
For fast photon emission, it pays off to "guide" the photons as much as possible: if a point light illuminates a scene with a relatively small specular object casting the caustic, it is more efficient to replace the point light (just for the photon generation) with a spot light that only illuminates that small specular object. This avoids emitting a lot of photons from the light source -- photons that will never hit the specular caustic generating object.
When a photon has been emitted from a light, it has to be reflected through the scene. What happens when a photon hits an object depends on the shading model assigned to that object. If the photon came from a specular reflection or refraction and hits a diffuse surface, it will be stored at that location in the caustic photon map. The photon will be absorbed, reflected or transmitted according to the shading model and the color of the object. The shading model is set by an attribute:
Attribute "photon" "shadingmodel" ["matte"|"translucent"|"chrome"|"glass"|"water"|"transparent"]
Matte, translucent, chrome, glass, water, and transparent are the
currently built-in shading models used for photon scattering. These
shading models use the color of the object (but opacity is ignored).
If the color is set to [0 0 0] all photons that hit the object will be
absorbed. (In the future, regular surface shaders will also be able
to control photon scattering. Then there will be a choice between the
flexibility of regular shaders vs. the efficiency of the built-in
shading models.)
Lets look at an example that puts all this together. A simple rib file generating a caustic photon map looks like this:
    FrameBegin 1
      Hider "photon" "emit" 1000000
      Translate 0 -0.5 8
      Rotate -40  1 0 0
      Rotate -20  0 1 0

      WorldBegin
        LightSource "spotlight_rts" 1 "from" [-4 7 -7] "to" [0 0 0]
                                      "intensity" 100 "coneangle" 0.2

        Attribute "photon" "causticmap" "causticrefl.cpm"

        # Diffuse ground plane
        AttributeBegin
          Attribute "photon" "shadingmodel" "matte"
          Color [1 1 1]
          Scale 3 3 3
          Polygon "P" [ -1 0 1  1 0 1  1 0 -1  -1 0 -1 ]
        AttributeEnd

        # Yellow metal box
        AttributeBegin
          Attribute "photon" "shadingmodel" "chrome"
          Color [1 1 0]
          Translate 0.3 0 0
          Rotate -30  0 1 0
          Polygon "P" [ 0 0 0  0 0 1  0 1 1  0 1 0 ]   # left side
          Polygon "P" [ 1 0 0  1 0 1  1 1 1  1 1 0 ]   # right side
          Polygon "P" [ 0 1 0  1 1 0  1 0 0  0 0 0 ]   # front side
          Polygon "P" [ 0 1 1  1 1 1  1 0 1  0 0 1 ]   # back side
          Polygon "P" [ 0 1 0  1 1 0  1 1 1  0 1 1 ]   # top
        AttributeEnd
      WorldEnd
    FrameEnd
The resulting photon map, causticrefl.cpm, is shown below. Each little dot is a photon.

Here's another example of a photon map. This one was generated from a rib file very similar the one listed above, but with a red glass sphere instead of the yellow metal box, and with a different light source position:
Note that since photon maps are generated in a separate pass, the scene used for photon map generation can be different from the scene used for rendering. For example, the caustics can be cast from a specular object that isn't even present in the rendering, or the light sources can be different from those used for rendering.
Also note that the attributes "trace" "maxspeculardepth" and "trace" "maxdiffusedepth" that are usually used to control maximum ray depths can also be used to control maximum photon depths. By default, objects are visible to photons. If you wish to make an object invisible to photons, just set the "visibility" "photon" attribute to 0.
Displaying caustic photon maps with Sho and ptviewer
Sho can display caustic photon maps as illustrated in the two figures above. The following command displays the caustic photon map 'cornell.cpm':
sho cornell.cpm
Sho displays the photon map from the camera viewpoint.
For other viewpoints, the interactive application ptviewer is helpful. It is very often useful to navigate around the photon map (rotate, zoom, etc.) to gain a better understanding of the photon distribution.
First, the surface shader can add the caustic color using the photonmap shadeop. In shading language:
Ci += Kc * photonmap(causticmap, P, N, "estimator", 50);
Here causticmap is the name of the caustic photon map, P is the
position at which to estimate the caustic color, N is the normalized
surface normal at P, and "estimator" specifies how many photons to use
for the caustic estimate. Small values of "estimator" give sharp but
noisy caustics, larger values give blurrier but less noisy caustics.
The second possibility is to use the the caustic shadeop:
Ci += Kc * caustic(P, N);
The caustic shadeop gets the name of the caustic photon map and the
number of photons to use from the following attributes:
    Attribute "photon" "causticmap" "causticrefl.cpm"
    Attribute "photon" "estimator" 200
A third possibility is to let a light source shader determine the caustic contribution (either with the photonmap or caustic shadeop), and add it to the diffuse illumination of each surface it is shining on. For example:
    light causticlight(
      color filter = color(1);
      output float __nonspecular = 1;)
    {
      normal Ns = shadingnormal(N);

      /* Compute "caustic illumination" */
      illuminate (Ps + Ns) {  /* force execution independent of light location */
	Cl = filter * caustic(Ps, Ns);
      }
    }
The causticmap and estimator attributes are picked up from each
surface the light shines on. This way, even an old, tired surface
shader such as matte or paintedplastic can handle caustics. For
example, consider the the following rib file:
    FrameBegin 1
      Format 400 300 1
      PixelSamples 4 4
      ShadingInterpolation "smooth"
      Display "reflective caustic" "it" "rgba"   # render image to 'it'
      Projection "perspective" "fov" 22
      Translate 0 -0.5 8
      Rotate -40  1 0 0
      Rotate -20  0 1 0

      WorldBegin
        LightSource "spotlight_rts" 1 "from" [-4 7 -7] "to" [0 0 0]
                                      "intensity" 100 "coneangle" 0.2
        LightSource "causticlight" 2

        Attribute "visibility" "int diffuse" 1      # make objects visible to rays
        Attribute "visibility" "int specular" 1     # make objects visible to rays
        Attribute "visibility" "int transmission" 1 # for shadows
        Attribute "photon" "causticmap" "causticrefl.cpm"
        Attribute "photon" "estimator" 200

        # Ground plane
        AttributeBegin
          Surface "matte"
          Color [1 1 1]
          Scale 3 3 3
          Polygon "P" [ -1 0 1  1 0 1  1 0 -1  -1 0 -1 ]
        AttributeEnd

        # Box
        AttributeBegin
          Surface "mirror"
          Color [1 1 0]
          Translate 0.3 0 0
          Rotate -30  0 1 0
          Polygon "P" [ 0 0 0  0 0 1  0 1 1  0 1 0 ]   # left side
          Polygon "P" [ 1 0 0  1 0 1  1 1 1  1 1 0 ]   # right side
          Polygon "P" [ 0 1 0  1 1 0  1 0 0  0 0 0 ]   # front side
          Polygon "P" [ 0 1 1  1 1 1  1 0 1  0 0 1 ]   # back side
          Polygon "P" [ 0 1 0  1 1 0  1 1 1  0 1 1 ]   # top
        AttributeEnd
      WorldEnd
    FrameEnd
This rib file generates the following image with a reflective caustic:
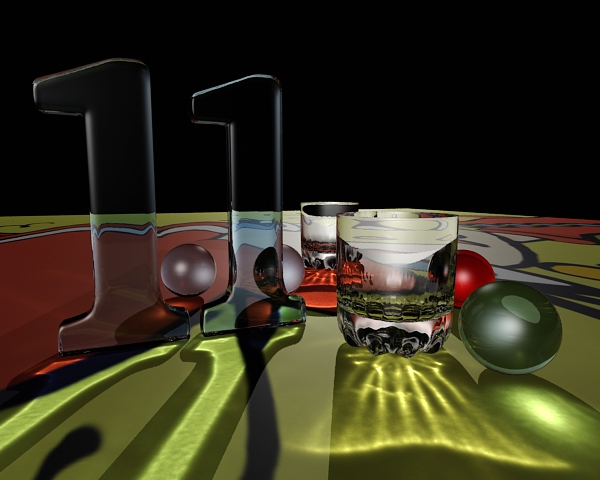
If the yellow box is replaced by a red glass sphere, the light source is moved a bit, and we use the second photon map shown above, we get the following image of a refractive caustic:
The caustic photon map has no photons in it.
Caustics are a specular-to-diffuse effect. So in order to get a caustic, the scene needs to have both specular and diffuse objects. Make sure that the light source illuminates the specular object. Also make sure that the attributes "trace" "maxspeculardepth" and "trace" "maxdiffusedepth" are set sufficiently high for the scene (the default values are 2 and 1, respectively).
The caustic photon map has very few photons in it.
Did you specify enough emitted photons (the "emit" parameter to the hider)? Values between 100,000 and 1,000,000 are typical. If you specified a large number of photons to be emitted, but only a few of them end up in the caustic photon map, the reason is often that only a small fraction of the emitted photons hit the specular objects. You can help by guiding the photon emission better. For example, turn point lights into spot lights pointing toward the specular objects, and/or narrow the cone of the spot lights so that the cone just covers the specular objects.
The picture shows no caustic.
First check that the caustic photon map has the right name and actually has photons in it. Make sure that the surface where the caustic should be has a caustic or photonmap shadeop, or that it is illuminated by a caustic light. Also, note that photons from point and spot lights inherently have a square fall-off. So if the lights you use for direct illumination have linear or no fall-off, the caustic can be very dim compared to the direct illumination.
The caustic is noisy.
Too few photons are used to estimate the caustic. If the photonmap shadeop is used, increase the "estimator" parameter. If the caustic shadeop is used, increase the "photon" "estimator" attribute.
The caustic is too blurry.
Either too many photons are used to estimate the caustic, or there are too few photons in the caustic photon map. To reduce the number of photons used in the caustic estimate, decrease the "estimator" parameter of the photonmap shadeop, or decrease the "photon" "estimator" attribute (if the caustic shadeop is used). To increase the number of photons in the caustic photon map, either increase the number of emitted photons with the "emit" parameter to the photon hider, or increase the fraction of photons that get stored (for example by reducing the cone angle of spot lights --- see item 2 above).
There are "polka dots" in the scene.
This can for example happen if the intensity of the caustic is set much higher than it should. Essentially, the polka dots are little regions around sparsely scattered photons. Usually the dots from sparse photons are so dim as to be invisible, but if the caustic color is multiplied by some very high multiplier, the dots can become visible. Either reduce the multiplier or increase the "estimator" to smooth the caustics --- either will dim the polka dots.
More information about the photon map method can be found in for example:
Information about PRMan's ray tracing functionality (that the photon tracing builds upon) can be found in the application note "A tour of ray traced shading in PRMan". PRMan's global illumination method (that also uses photon maps) is described in the application note "Ambient occlusion, image-based illumination, and global illumination".
| Pixar
Animation Studios
|