Prev |
Next
To get started, let's open the Maya scene, global_illumination.ma.
(Where are the tutorial files?)
|
1 —
BEFORE GLOBAL ILLUMINATION |
RenderMan for Maya lets you create global illumination effects in a variety
of ways. Global illumination is a term that is widely used to refer to effects
that create subtle soft shadows in a scene. To create global illumination
effects we'll use the RenderMan
Environment Light, which has several schemes
for creating these types of effects. As we use these different schemes, you'll begin to understand
how to most effectively employ the RenderMan Environment Light.
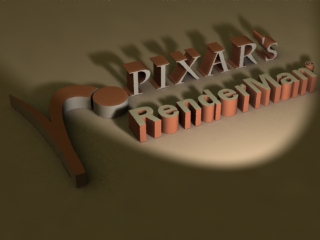
First, let's render the Maya scene, global_illumination.ma.
Render-> Render Current Frame
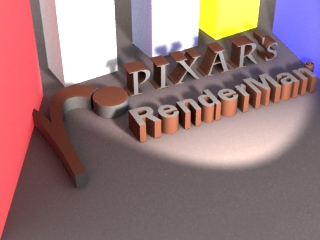
You'll get an image like the
one below:
Direct lighting. No global illumination effects.
Perhaps the most production-ready scheme for creating global
illumination effects is occlusion. Occlusion is an effect that simply determines how much a
surface point is obscured by other surfaces. This technique can be used to
create highly realistic images. The best means to motivate occlusion
is probably to show a picture, so here's a picture of the scene above rendered
only with the occlusion effect (no other shaders or scene lights were
used):

Pure occlusion
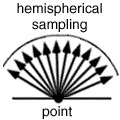
Occlusion creates nice diffuse shadowing. Keep in mind that
this is an expensive
ray-traced effect, requiring any given point to send many (sometimes
thousands) of rays into a scene. Sending many rays from a point like this is
called hemispherical sampling. The end result of hemispherical sampling is the average
amount that a point is covered. Here is a diagram:
Now we'll create this occlusion effect. To add occlusion we'll create a RenderMan
Environment Light:
1) Open the Render Globals.
2) Select the "Features" tab.
3) Enable the "Ray Tracing" check box.
4) Under the "Global Illumation" create an "Environment Light."
By following the instructions above, a RenderMan Environment Light will
be added to your scene. In the image below we can see that a RenderMan
Enviroment Light has been added to the Maya scene.
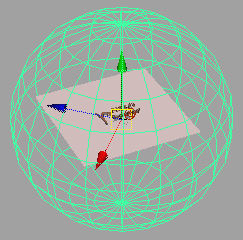
The RenderMan
Environment Light
Adding a RenderMan Environment Light is all you need to do to enable default occlusion. The
color of the occlusion effect is determined by the environment color of the
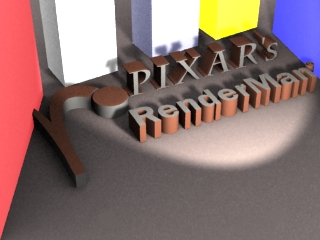
RenderMan Environment Light. Now render again ... occlusion is an expensive effect,
but after a while you should get an
image like the one below:

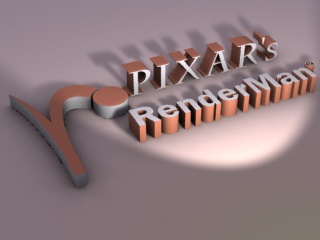
Default occlusion
The occlusion
effect contributes to the existing lighting in a scene. You can see the subtle shadowing that occlusion adds.
You'll also notice some artifacts in the occlusion, and that's because
occlusion defaults to faster, lower quality, settings. Next we'll explore
these quality/speed controls.
When rendering occlusion effects, preview renders can be
accelerated by using quality settings that are faster, yet lower quality,
because some artifacts may be acceptable in order to get faster iterative
renders. On the other hand, a final rendered sequence requires high-quality,
artifact-free settings. There are two main quality controls for occlusion: samples
and max variation.
Samples — Controls how many hemispherical samples a
point on a surface casts into a scene. More samples means higher quality. 64
samples is low quality while 1024 samples is high.
Max variation — Controls how often points on surfaces
perform hemispherical sampling. 10 is low quality, while 1 (or lower) is high
quality. Next we'll increase the quality settings for this image. A Max Variation setting of
0.0 uses no approximation, and is the
highest quality setting. However, a setting of 1.0 is usually sufficient for
production work.
To increase the quality settings, open the RenderMan
Enviroment Light in Maya's Attribute Editor:
1) Change the Sampling Mode to "Sampled".
2) Set Samples to 256.
3) Set Max Variation to 1.
Setting the samples to 256 casts more ray samples,
creating smoother shadows. (A higher quality
sample rate would be 512 or 1024.) Setting Max Variation to 1 causes
less approximation to occur, also increasing the quality of the shadows. Now render again:
Occlusion with
higher quality settings
With higher quality settings the occlusion effect is much
smoother, but it also takes longer to render. It's a quality/speed trade-off.
You'll find the RenderMan Environment Light also provides a number of parameters for adjusting the
artistic nature of the effect. The occlusion intensity can be changed, an
environoment map can be added, etc. You'll want to be sure to familiarize
yourself with these features.
Because occlusion is an expensive effect, RenderMan for Maya allows you
to reuse these calculations by caching the data on disk.
Currently, the occlusion effect is being calculated when the
final image is rendered. To cache the data, we'll bake the occlusion in a
pre-pass (similar to how a shadow map is calculated during a pre-pass and
automatically reused in the final image). To bake occlusion do the following:
1) Select the RenderMan Environment Light.
2) In the Attribute Editor, right-click in the Bake parameter's field and select
     rmanMakeGlobalDiffuse3dPass.
3) The rmanMakeGlobalDiffuse3dPass tab will open. Leave the settings at their defaults.
In order to reuse the data we must first bake it. We've just
set up RenderMan for Maya to bake the data. So we can render again:
Render-> Render Current Frame
When the image is rendered, the occlusion will be baked in a
pre-pass and
stored to disk. Next we'll reuse this baked data. To reuse the data do the
following:
1) Open the bake pass in the Attribute Editor by clicking on the
     connection button next to the Environment Light's Bake parameter.
2) With the rmanMakeGlobalDiffuse3dPass open, switch the Caching
     Behavior from Compute to Reuse.
When RenderMan for Maya renders the scene it will now reuse
the occlusion data, resulting in a much faster rendering. Voila!
Reused occlusion

You can bake occlusion into a 3D texture format (called a “Brick Map”), or you
can bake the data into a 2D texture (camera projection). The right choice will depend on your
particular purposes; you'll want to experiment with both. The 3D format is
generally a good (camera independent) choice.
You can also configure the occlusion pass directly through Passes
tab in the Render Globals. The Passes tab gives
you a high degree of control over the individual passes that are part of any
render job. By
selecting a different pass in the Pass Settings window, parameters will
automatically appear for that pass. Now that we've successfully reused occlusion, we'll delete the pass
because it is not needed for the rest of the tutorial. To delete the pass, do
the following:
1) Open the Render Globals.
2) Select the RenderMan Passes tab.
3) You'll see a list under Pass Settings, select rmanMakeGlobalDiffuse3dPass
     so it is highlighted.
4) Press the Delete Pass button to remove the occlusion pass.
|
5 —
ADDING COLOR BLEEDING |
(Before going on to this step make sure you've deleted the occlusion
pass as shown above.)
Color bleeding is an expensive
ray tracing effect, more expensive than occlusion, but it has the
additional feature of allowing colors to “bleed” from one surface
onto another, making it useful in those
instances when that added realism is required. Next
we'll create this effect. To switch from occlusion to color bleeding, do the
following:
1) Open the RenderMan Environment Light in the Attribute Editor.
2) In the "Shadowing" parameter, select "Color Bleeding".
That's all you need to do to enable color bleeding. To speed
up the rendering a little more, we'll lower the quality settings. Return to
the RenderMan Environment Light:
1) Set Samples to 64.
2) Set Max Variation to 5.
The artistic look of color bleeding can be dramatically changed by
adjusting Max
Dist. The appropriate setting for a scene will be determined by the
distances between objects and the artistic goal. By lengthing and shortening
the distance rays are shot, the objects that contribute to the color bleeding
effect can be controlled.
Now render again. This image may take
a couple minutes to render. After a while you should get an
image like the one below:

Color Bleeding
You'll notice this image looks very similar to the occlusion
effect. However, if you look closely, you'll notice some color bleeding
(between the floor and the base of the “RenderMan” lettering, for
instance).
The difference between occlusion and color bleeding is more
apparent in scenes that have materials with bright colors. In this example,
there is a layer named "color_bleeder" with several colorful
objects. This layer is currently invisible. Make the layer
"color_bleeder" visible and render the scene again with color
bleeding. The effect of color bleeding should now be more
visible.
|
Rendered with color
bleeding |
Rendered with occlusion |
Before we go to the next step, be sure to hide the color_bleeder
layer. It is no longer needed.

There are four special parameters for controlling
the “strength” of global illumination effects at the shading module level:
- Colorbleeding Scale — a multiplier for incoming
intra-object colorbleeding.
- Radiosity Scale — a multiplier for outgoing
diffuse energy (colorbleeding).
- Diffuse Environ Scale — a multiplier for incoming
indirect diffuse environment light.
- Specular Environ Scale — a multiplier for incoming
specular environment light.
These can be added to most materials by selecting RenderMan-> Add Environment
Controls from the Attributes menu of the Attribute Editor.
So far we've used occlusion and color bleeding to create
subtle shading effects in this scene. In both cases, however, the color of the
environment light has been white. Instead of using a simple white environment
color, we can add an environment map, a technique that can be used to simulate
complicated lighting quickly. The technique of using an environment map to
illuminate a scene is called image based lighting.
Image based lighting can use many kinds of image formats.
RenderMan for Maya supports both HDRI and normal images. Here's the
environment map we'll use in this scene. It's a normal image, not an HDRI ...
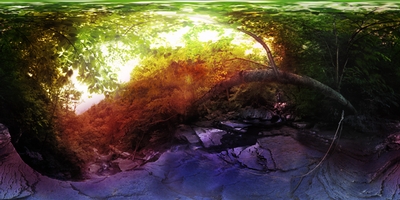
ibi.tif
In this example,
we'll load up an environment map. Here's how to load the environment map:
1) Open the RenderMan Environment Light in the Attribute Editor.
2) In the Environment Map parameter, browse for an image.
3) In the image browser select "ibi.tif" from this project's sourceimages folder.
4) Change the environment light's Sampling Mode from filtered to sampled.
Notice the RenderMan Environment light will display the image in
Maya's interactive mode like this ...
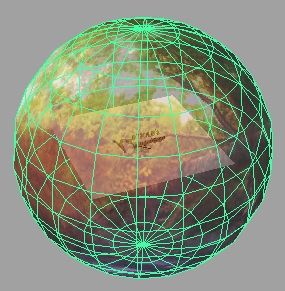
Map displayed on
the RenderMan
Environment Light
Because occlusion is much cheaper that color bleeding, switch
the Shadowing in the RenderMan Environment light to Occlusion.
Now render again. The environment map will now cast light into the scene, like
this:
Occlusion with an
environment map
Notice how image based lighting techniques have been combined
in the image above. To create pure image based lighting, delete the spot
light. Now all of the illumination in the scene will come from image based
lighting. To brighten the effect of the environment map, increase the intensity
of the RenderMan Environment Light to "4". Now render again. The
environment map will now illuminate the scene by itself:
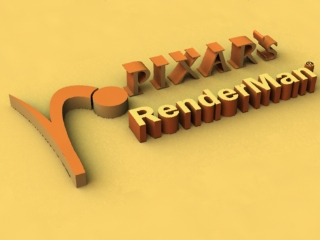
Image based
lighting with occlusion.
The combination of an environment map and occlusion can create some
interesting effects, but you'll notice that the shadows created with occlusion
are a function of geometry and not the image map. For more accurate shadows
(especially when using HDRI), an enviroment map should be combined with color
bleeding, and while this technique is quite expensive to compute, it is the
most accurate image based lighting method available (if you can afford to
render it).
|
7 —
POINT-BASED GLOBAL ILLUMINATION |
The basic workflow for using point-based global illumination (approximate occlusion
and color bleeding without ray tracing) is fundamentally the same as what we've described
above. There is one major difference in the approach, however, which requires one simple
step and introduces a new pass to your render. Point-based global illumination depends
on a pre-baked point cloud, so you need to create a baking pass via the Bake parameter of
the Environment Light node. You can choose either a single-pass approach, RenderRadiosity,
or a two-pass approach for reusing the data, MakeApproxGlobalDiffuse.
Right-click in the Bake field and select your method of choice from the list presented.
The Pass window is essentially the same as any other, but we want to pay particular
attention to a couple of parameters that might otherwise go unnoticed. Point-based GI
produces excellent results at coarser shading rates, so the first thing we want to note is
that the default shading rate is 100. This is far from production quality, but you will find
that you don't need to crank it down as far as you'd think in order to get excellent results.
Additionally, ray tracing is explicitly disabled for this pass (though it need not be).
Take some time to run through the steps outlined above using point-based instead of ray-traced
global illumination. You will probably need to tweak a parameter or two to optimize the quality
of your results, but it won't take long for you to see the benefits of the new technique.
|
8 —
SUMMARY |
You are able to create occlusion and color bleeding effects with RenderMan for Maya by
creating a RenderMan Environment Light in the Render Globals. These effects can be baked
during a pre-pass
which is referenced when the final image is rendered, just like
shadow maps. Occlusion is a production-ready effect.
Color bleeding is more accurate but carries a greater overhead than occlusion.
Additionally, by adding an environment map to the RenderMan Environment Light,
image based lighting techniques can be employed.
Prev |
Next
|
Pixar Animation Studios
Copyright©
Pixar. All rights reserved.
Pixar® and RenderMan® are registered trademarks of Pixar.
All other trademarks are the properties of their respective holders. |